PILLOW FINISHING SUPPLIES
🧵 completed cross stitch
🧵 backing fabric
🧵 small scraps of batting
🧵 Polyfil
🧵 needle
🧵 matching thread of trim
🧵chenille trim
🧵 scissors
🧵 rotary cutter
🧵 ruler
🧵 cutting mat
🧵chopstick
🧵 iron
🧵Spritz bottle of water
I stitch a lot of smalls and I try to use every scrap of fabric that I can . Today I stitched "Spring " from the Border & Header section of my Spring Stamps SAL. You can tell that I left myself little workroom in respect to the edges.
 |
| Cross stitch is ready to be turned into a pillow |
This is a conscious decision so if you have an idea on how you are going to finish yours ahead of time and you know that you would like to have a lot of room between the stitch and the end of your pillow give yourself more room around the edges. I usually like my pillows pretty tight between the stitch and the edge of the pin pillow depending on the design. You can see on my Stamp pillows there is about 1/4" from edge of stitching to the trim.
Some stitchers add interfacing to the back of their stitching for stability when creating pillow finishes. That is up to you . I am working with 14 count aida and am just fine not using it on the small pillows. These pin pillows are just for my enjoyment, and I know how they will be used and displayed so I forgo that step. If I was using a thinner fabric or the piece was larger, I would certainly use interfacing.
Now let's get down to the nitty gritty!
1. Give your stitch a good pressing before beginning. Measure how much room you have from the edge of the fabric to the stitching on each side of the stitched piece. On this piece , the smallest amount of fabric that I have from the stitching to the edge of the fabric is a hair over 1/2" .
 |
| Measure how much room you have between stitching and edge. |
So that means I am going to cut my aida about 1/2" from the stitching on all 4 sides. I actually counted about 10 stitch lengths from the stitching. Use the lines in the fabric to help you in alignment when cutting.
 |
| The cross stitch is all trimmed. |
2. Next cut out your backing fabric. I am using an old shirt today. I like to cut my backing fabric larger than my stitched piece.
 |
| Cut out backing piece larger than the stitched piece. |
3. Place your stitching face down on the right side of the backing fabric. Yikes don' t look at my backside!! I am not a neat stitcher. Lol😂😁
I like to pin my piece.
 |
| Cross Stitch is pinned to backing and is ready to be sewn. |
4. Now it is time to head to the sewing machine. I have the tendency to start at the bottom of my stitch and sew a 1/4" seam around the edge of the pillow. Since I am using aida, I pay close attention to where the needle is going on my machine making sure it stays on a particular line in the aida in order to keep the seam even. I remove the pins as I sew.
 |
| Sewing a 1/4" seam around edges. |
When I come to the corner of each piece, I sew on through and then lift the needle and pivot the cross stitch to sew the next side. I do this rather than rotate the stitch as I sew in order to prevent myself from creating curved corners.
 |
| Sewing to the end of the cross stitch. |
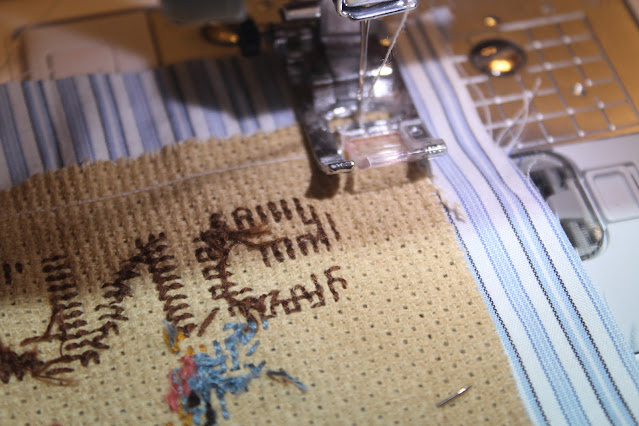 |
| Lift up pressure foot, pivot cross stitch, sew down next side of cross stitch. |
5. A lot of stitchers sew the pillow closed and cut a small opening in the back and stuff their pillows, and then they add a piece of felt or fabric to hide the hole, I have tried that , but I still like the old method of leaving an opening at the bottom of my pillow. That is up to you as to where you want the opening to be .
Notice at the bottom I left a small opening of about an inch ( I am comfortable working with that small of a hole) .
 |
| The pillow is sewn with opening at bottom . |
6. Trim excess backing fabric on each side .
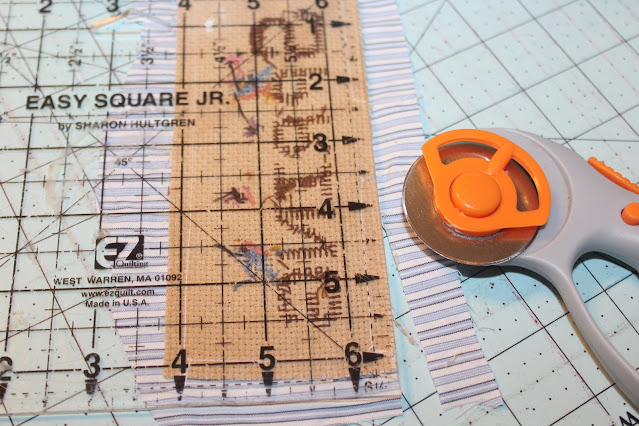 |
| Trim excess backing fabric . |
7. I then cut a small snip off of each corner to reduce the bulk.
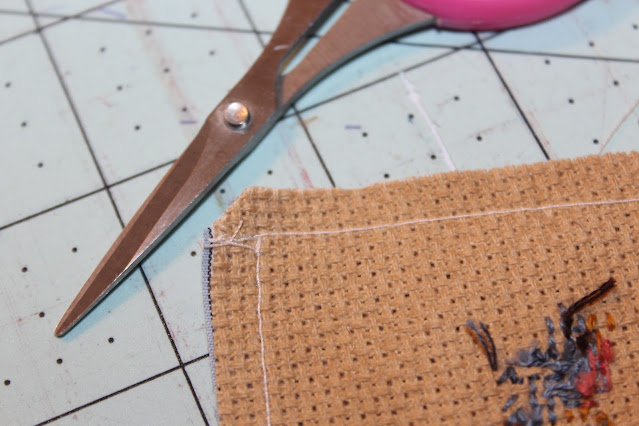 |
| Snipping off the corner of my cross stitch. |
The corners are snipped.
 |
| All 4 corners snipped. |
8. Now turn the stitch to the right side through the small hole in the bottom of the piece.
 |
| Pillow is ready to be stuffed. |
9. Using my fingers and chopstick , I smooth out the edges inside the pillow being careful not to poke through the fabrics.
10. I begin stuffing by adding scraps of batting to the upper corners of the stitched piece. I pack the corners as tight as possible.
 |
| Fixing to add scrap pieces of batting to the top corners of the cross stitch pillow . |
11. Next I begin to pull apart my Polyfil making it as fluffy as possible . You remember the bowl I started with. Well here it is all fluffed up.
 |
| Fluff up your Polyfil by pulling it apart. |
12. I begin stuffing the pillow with polyfil beginning at the top corners of the stitched piece which are already filled with batting. Use your fingers and chopstick . Pack as tightly as possible.
13. As you near the bottom of the stitch, add batting to the bottom corners of the stitched piece , stuff tightly and then continue adding Polyfil until you are satisfied with the feel of the pillow. I like mine tight.
14. Using matching thread and your needle, whip stitch the opening closed. I try to make my stitches as small as possible so they do not show. But if you are adding it trim , they will not show anyway and today I am adding trim. There are several videos on Youtube on how to do the whip stitch.
 |
| Whip stitch the opening closed. |
ADDING CHENILLE TRIM
15. I bought my cream chenille trim from Walmart a couple of years ago . One skein will last a loooong time.
 |
| I am ready to add chenille trim to my pillow. |
I begin by giving myself a generous amount of chenille trim. I didn't officially measure on this piece , but you can see that I looped the chenille around the stitch 2 times .Lots of trim there. I then tea dyed my trim to tone it down.
 |
| Chenille trim ready to be added . |
16. I fold the chenille trim once to create 2 strands.
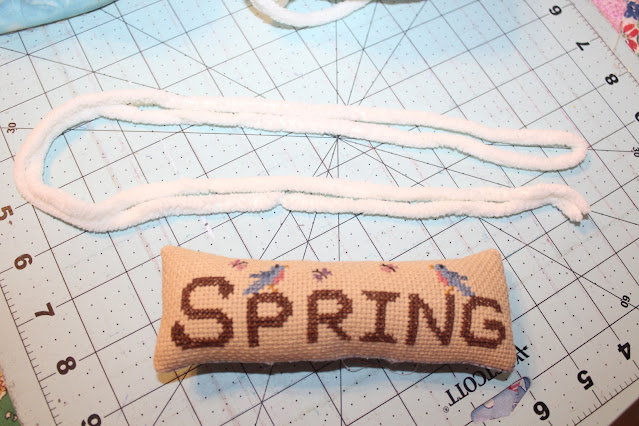 |
| Fold chenille trim in half once. |
17. I begin my twisting the ends of my trim and whip stitching it to the bottom of seam of my stitch.
 |
| Twist ends and whip stitch to bottom seam. |
I then twist the trim away from me. I work with small sections at a time twisting, pinning and then whip stitching until I get to the corner.
 |
| Twist, pin and whip stitch the trim down. |
As I whip stitch I try to make my thread go along with the twist of the chenille. I begin with my thread in the front of the pillow, loop it around to the back of the pillow through the seam to the front .
 |
| Use thread that matches trim and try to make your stitches follow the direction of the twist of the trim. |
19. Once I reach a corner, I remove the pins , turn the chenille and continue twisting and I add pins to the next edge repeating the process of whip stitching to the next corner.
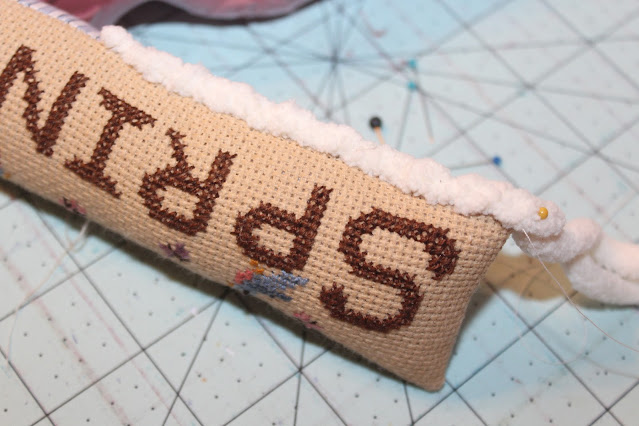 |
| I have reached the 1st corner. Turn and twist trim . Repeat process. |
 |
| Adding trim to the next side. |
20. As I come to the end , I slightly overlap the end of the chenille to the beginning of the chenille trim and pin it in place. You can see I still have a lot left over. I whip stitch over a small section of the overlap.
 |
| Overlapping the trim slightly , Whip stitch in place. |
21. I leave the needle in place and then carefully cut the excess trim away from the pillow.
 |
| Cut excess trim and whip stitch any of the chenille trim left into place. |
22. Sew the edge of the trim down. Tie off and sink knot into the pillow . Remove needle and thread.
23. If you like your pillow to be puffy, you are finished. If you want to flatten it a bit then get out the trusty ole' iron and a spritz bottle of water.
 |
| Lightly spritz the back of your pillow and press with iron if you want a flatter pillow. |
Lightly spritz your pin pillow with water on the back and then press the iron onto your pillow.
 |
| The back of the pillow. |
24. Wahlah! Your pin pillow is finished!!!! HAPPY DANCE TIME!!!! Cha! Cha! Cha! 💃💃💃💃💃
As always...
Happy Stitching and Quilting, ya'll
Melisa
Thank you for the sweet visit.
The only way to finish is to start.
Hugs and Stitches!!!!🤗🧵❤
Dedicated to my baby sister, Amy. Love and miss you, Amo.


Your Spring pin pillow is adorable, Melisa. Thanks for the great tutorial.
ReplyDeleteOh thank you so much, Ivani. I had a wonderful time working on this little pin pillow . I look forward to adding it to my spring pieces. Have a great weekend.
DeleteNo cross stitch or quilt police here. Not allowed. They're kicked out along with that frog. ;-)
ReplyDeleteThank you for the tutorial - I've never made a pin cushion for myself before. I guess I really should try. Make one for me and one for my dd who's an avid cross stitcher and maybe one for my grand daughter who is starting to make quilts. Blessings.
I am so glad to hear that , Donna and glad to hear the frog has been kicked to the curb as well. I don't need him hanging around. Lol. I bet you would do a great job making a pin cushion, Donna. Oh , you are so fortunate to have family members who enjoy needlework as well. It must be so nice that ya'll can share these passions.
DeleteAwesome, Melisa! Thank you for sharing!
ReplyDeleteThank you so much, Robin. I struggle on finishing, but I do love making the pillows. Hugs.
DeleteGreat tutorial! I love the chenille trim. We definitely won't call the stitching police because we love seeing all your fabulous stitching patterns that you so generously let us use!
ReplyDeleteLol thank you so much, Vicki. I would hate to dodge the stitching police along with the quilting police right on my heels. Lol. But I had a great time working on this little pillow. Thank you for the sweet visit.
DeleteI've been wondering how you do that, with the chenille trim! I may have to try it on my Bluebird and Bees. The seam on the bottom definitely needs to be covered up, lol! This little Spring pin pillow is adorable, Melisa!
ReplyDeleteAaah thank you , Diann. The chenille trim is so easy to work with . I hope you will give it a try sometime . Have a wonderful weekend. Hugs.
DeleteWhat a great tutorial! I wondered how you achieved that edge finish. . .now I know!!!---TerryK@OnGoingProjects
ReplyDeleteYou are so very kind, Terry. Thank you so much. The chenille trim was easy to work with. Have a very lovely weekend, my dear.
DeleteThanks for the finishing lesson. I struggle with how to finish my projects and will use this post when I attempt my first pillow finish. I'm fortunate that I was gifted a portable sewing machine by my dear Mama-like friend Peggy, who is 87 and doesn't sew anymore.
ReplyDeleteYour finishes are so adorable and keep me inspired ❤️ cindyls5462.
Oh thank you so much, Cindy. I hope this has inspired you to try a pillow finish. I am like you - I struggle with how to finish my pieces as well. I guess that is why I always go back to pillows. Lol. How exciting to be gifted a sewing machine. I hope you enjoy using it. That is such a sweet gift from dear Peggy. Have a great weekend. Hugs.
DeleteOh I love this - thank you for sharing. Love your tip for the chenille trim.
ReplyDeleteAaah thank you so much, Valerie. I have an affection for making pin pillows and the chenille is so easy to work with. Have a lovely day.
DeleteSuch a cute finish. Where do you get the chenille trim?
ReplyDeleteAaah thank you so much, Pam. I enjoyed working on this little pillow. I get the chenille yarn at Walmart. A whole skein will last a long time. Happy stitching.
DeleteA wonderful tutorial! I haven't ever edged a little pillow or pincushion and am looking forward to trying it someday! Love the idea of using the top of your design on it's own!
ReplyDeleteOh thank you so much, Kathy. The chenille trim is very easy to work with . I hope to one day to learn other trims as well. Have a blessed day and thank you for the sweet visit.
DeleteYour directions on finishing is right up there with the professionals on Utube. Great pictures to show what you were doing. I had never thought to 'twist' the chennile, thanks for the tip.
ReplyDeleteMarie, I so appreciate the kind and encouraging compliment. I always struggle with my finishing, but I thought I would share how it do it anyway. Thank you again . Have a great day.
DeleteThank you very much for the very detailed tutorial, Melissa!
ReplyDeleteI often don't know how to finish off my cross stitch work and this is a great idea.
Hugs from Spain
Oh thank you so much, Isabel. I struggle with finishing ideas too, but often go back to pin pillows. I tuck them in bowls and on shelves and have a fondness for them. Have a beautiful day, my friend. Hugs.
DeleteGreat tutorial! Love the chenille finish!!
ReplyDeleteAaah thank you so much, Brenda. I enjoyed working with the chenille trim. Have a lovely day.
DeleteGreat tutorial!!! I love that you work by the seat-of-your-pants, and everything turns out beautiful! Love the
ReplyDelete'do what makes you happy" approach to finishing these sweet smalls and pin pillows. Hugs from sunny Arizona.
Aaah thank you so much, dear Mary. Your kindness warms my heart. Sending you big hugs.
DeleteThank you for the fantastic tutorial, Melisa. Yes, there are loads of pictures but we need them along with your written words.
ReplyDeleteOh thank you so much, Susie. I know I am a visual learner. I appreciate the sweet visit. Happy stitching.
DeleteWow thats so pretty, thanks for sharing with us!
ReplyDeleteAaah you are so very kind, dear Susan. Thank you so much. Have a very lovely day.
DeleteBellismo como todo lo que haces dulce amiga.
ReplyDeleteYa termine mi 7mo cuadrante que puedes ver en mi cuenta!!
A por el 8vo!!!! Un abrazo
Tu amiga
Diabet
Aaah I can not wait to see it my friend. I hope you enjoyed the stitch. You are the sweetest, Big hugs.
DeleteHi Melisa wow this sure is one cute pin cushion ,your work is beautiful,thankyou for sharing it with us ,hope you have a lovely day 🌹🤍🌹
ReplyDeleteAaah thank you so much, Shez. You are so very kind. I enjoyed sharing how I make my pillows. Have a blessed day.
DeleteWow, I missed this one, too. What a great tutorial for what you do!
ReplyDeleteOh thank you so much, Susan. I had a lot of fun finishing this little pillow. I have an affection for pillow finishes for some reason . Lol. Hugs.
DeleteLove the look of the chenille yarn in your finishes. Thanks for the tutorial. Plus, it is also good to know that it can be died. Hmmmm....Oh, did I glimpse a couple of upcoming stamps? So cute!
ReplyDeleteOh thank you so much, Ginny. The chenille takes on the tea/ coffee dye easily which I was surprised. Lol you did. I did not realize I had picked up that sweet stitch as I was working .Hee Hee!
DeleteGreat tutorial. Lots of details. Thank you
ReplyDeleteAaah thank you so much dear. I enjoyed sharing how I make my little pillows. Have a blessed day.
DeleteInstruction #4 is a game-changer! I used to stitch past the point when making collars on shirts, but never thought to do it to make perfect corners on little projects. Sheesh! And then, Twist and whipstitch! So that is how you get such a pretty edging. Well, I've learned 2 new tricks today! Thanks so much for the instructions and especially the step-by-step pictures. Kris
ReplyDeleteAaaah thank you so much , Kris. Lol I am bad about wanting to turn the corner as I sew but I have learned to refrain after making too many rounded corners. Ha Ha! Thank you for the sweet visit and kind words. Hugs
Deleteyour family history of tobacco was wonderful!! thank you for sharing
ReplyDeleteAaah you are so welcome, Kit and thank you for dropping by for a sweet visit and for the kind words. I enjoyed sharing a stroll down memory lane. Have a beautiful day.
DeleteAaah, Joy I am so touched humbled by your kindness; Thank you from the bottom of my heart. It means the world that you take the time to visit me and means more than you will ever know. Sending hugs and blessings and I wish you the most wonderful weekend.
ReplyDeleteReally enjoyed this "little" tutorial! The pin pillows are so cute. Thank you!
ReplyDeleteYou make everything look so easy 😃. Thanks for sharing your way of finishing... I won't forget to dance at the end... cha cha cha... 😉.
ReplyDeleteHola querida Melisa como siempre una entrada preciosa y un Tutorial super bien explicado! Con razón te quedan tan lindos tus mini cojines!. Me encantan!
ReplyDeleteAbrazos y besos de tu amiga y fiel seguidora Dianet de Parchesdeamot.
Y nada de bajar el ritmo de publicaciones NO que nos gustan muchísimo. Besos
A useful and well-explained guide for selecting the best pillow-cushion for daily use, highlighting comfort, support, and material choices to ensure consistent, healthy, and restful sleep.
ReplyDeleteRinipo explains ergonomic comfort in a pillow cushion
ReplyDeletesimple and useful way, making it easy to understand how the right support products can improve posture, comfort, and everyday well-being.
A practical and easy-to-follow guide that helps pillow-cushion anyone buying pillows online understand key factors like support, material, and comfort for confident purchasing decisions.
ReplyDeleteErgonomic cushions provide targeted support pillow cushion to the spine, improve sitting posture, relieve pressure points, and help reduce back pain naturally without medication or invasive treatments.
ReplyDeleteCushions prevent chronic back pain pillow cushion by supporting proper spinal alignment, reducing pressure on the lower back, improving posture during sitting, and alleviating strain on muscles and joints over time.
ReplyDeleteErgonomic pillows support proper neck and pillow cushion spine alignment, reduce muscle strain, and improve sleep quality, helping prevent pain and promote overall physical health.
ReplyDeleteErgonomic solutions for urban sleep pillow cushion problems use supportive pillows, mattresses, and sleep accessories to combat poor posture, stress, and restless environments, promoting better rest and overall well-being.
ReplyDeleteIdeal wedge pillow height selection ensures proper pillow cushion spinal alignment and comfort, typically ranging from 4–12 inches, tailored to back support, posture improvement, or relief from medical conditions.
ReplyDeleteThis comment has been removed by the author.
ReplyDeleteNice articles and your information valuable and good articles thanks for the sharing information sleeping pillow
ReplyDeleteNice articles and your information valuable and good articles thanks for the sharing information Lap desk pillow
ReplyDelete