Blog Archive

Tuesday, February 28, 2023

Shamrock Quilt Block - A St. Patrick's Day Cross stitch Freebie

 Hello there , Sunshine!!! It is a beautiful day with the highs expected to reach 80 !๐ŸŒž

Today I thought I would share a super quick teeny weeny stitch and thrifty finish with  you. 


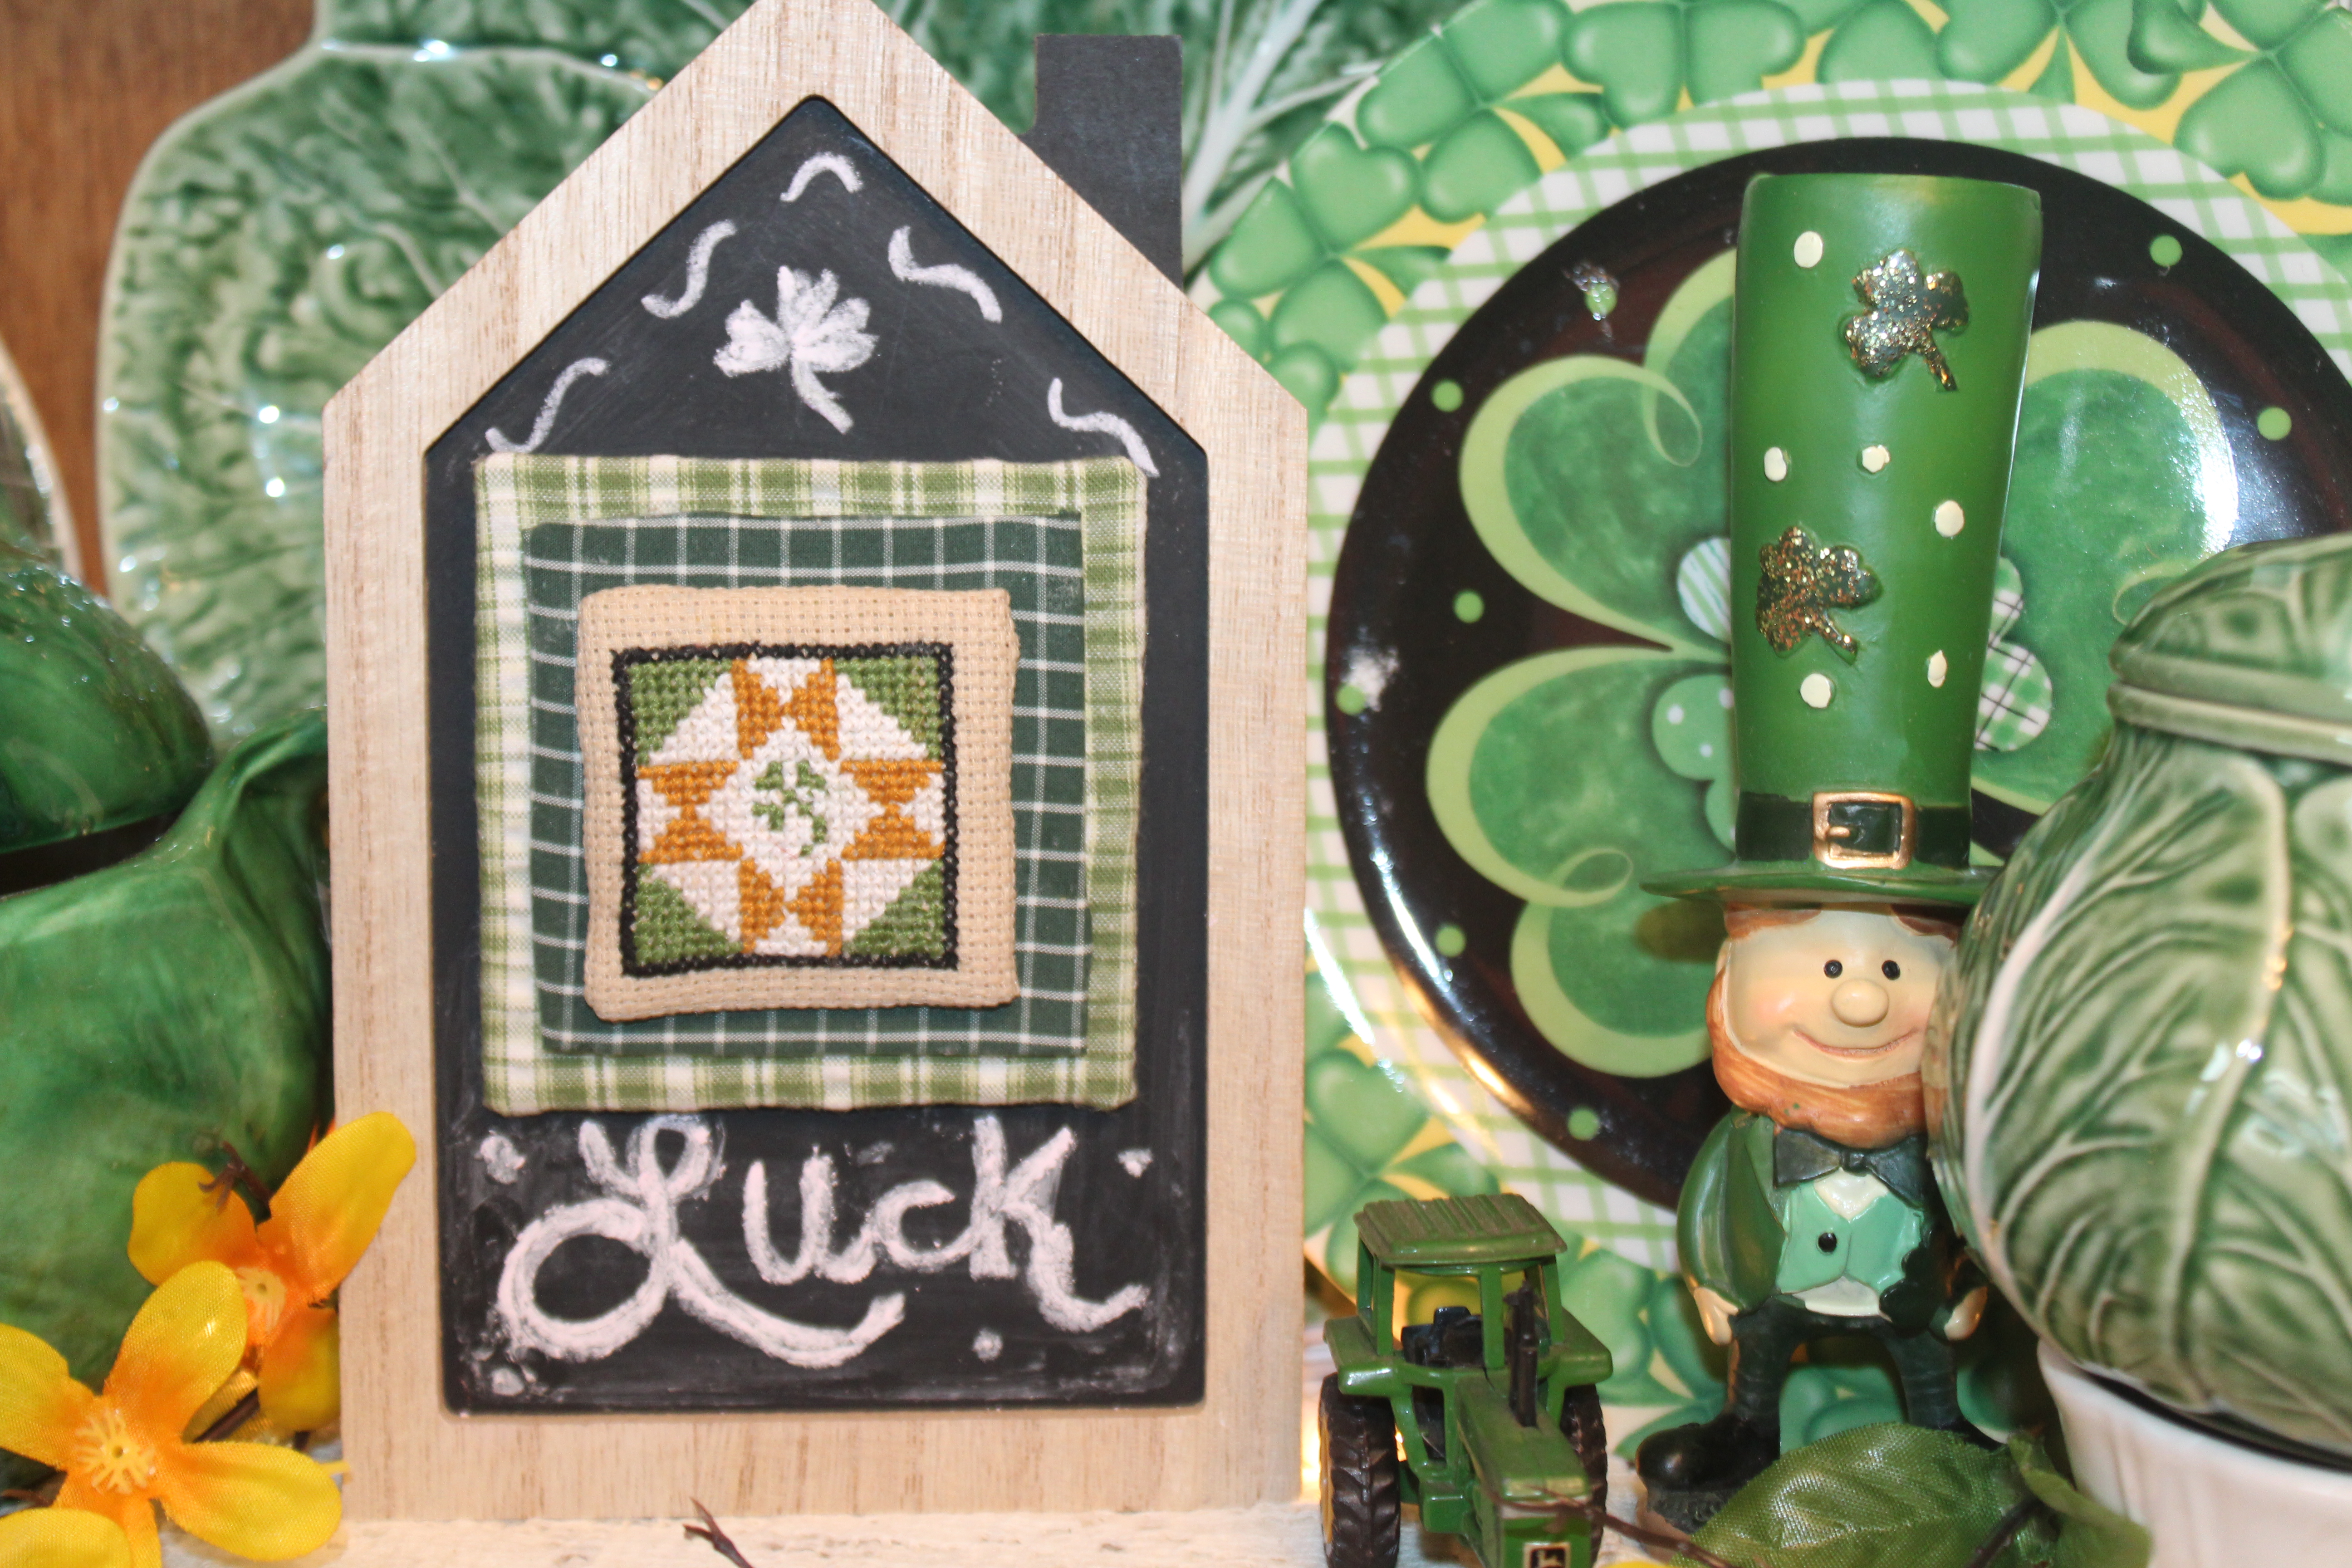
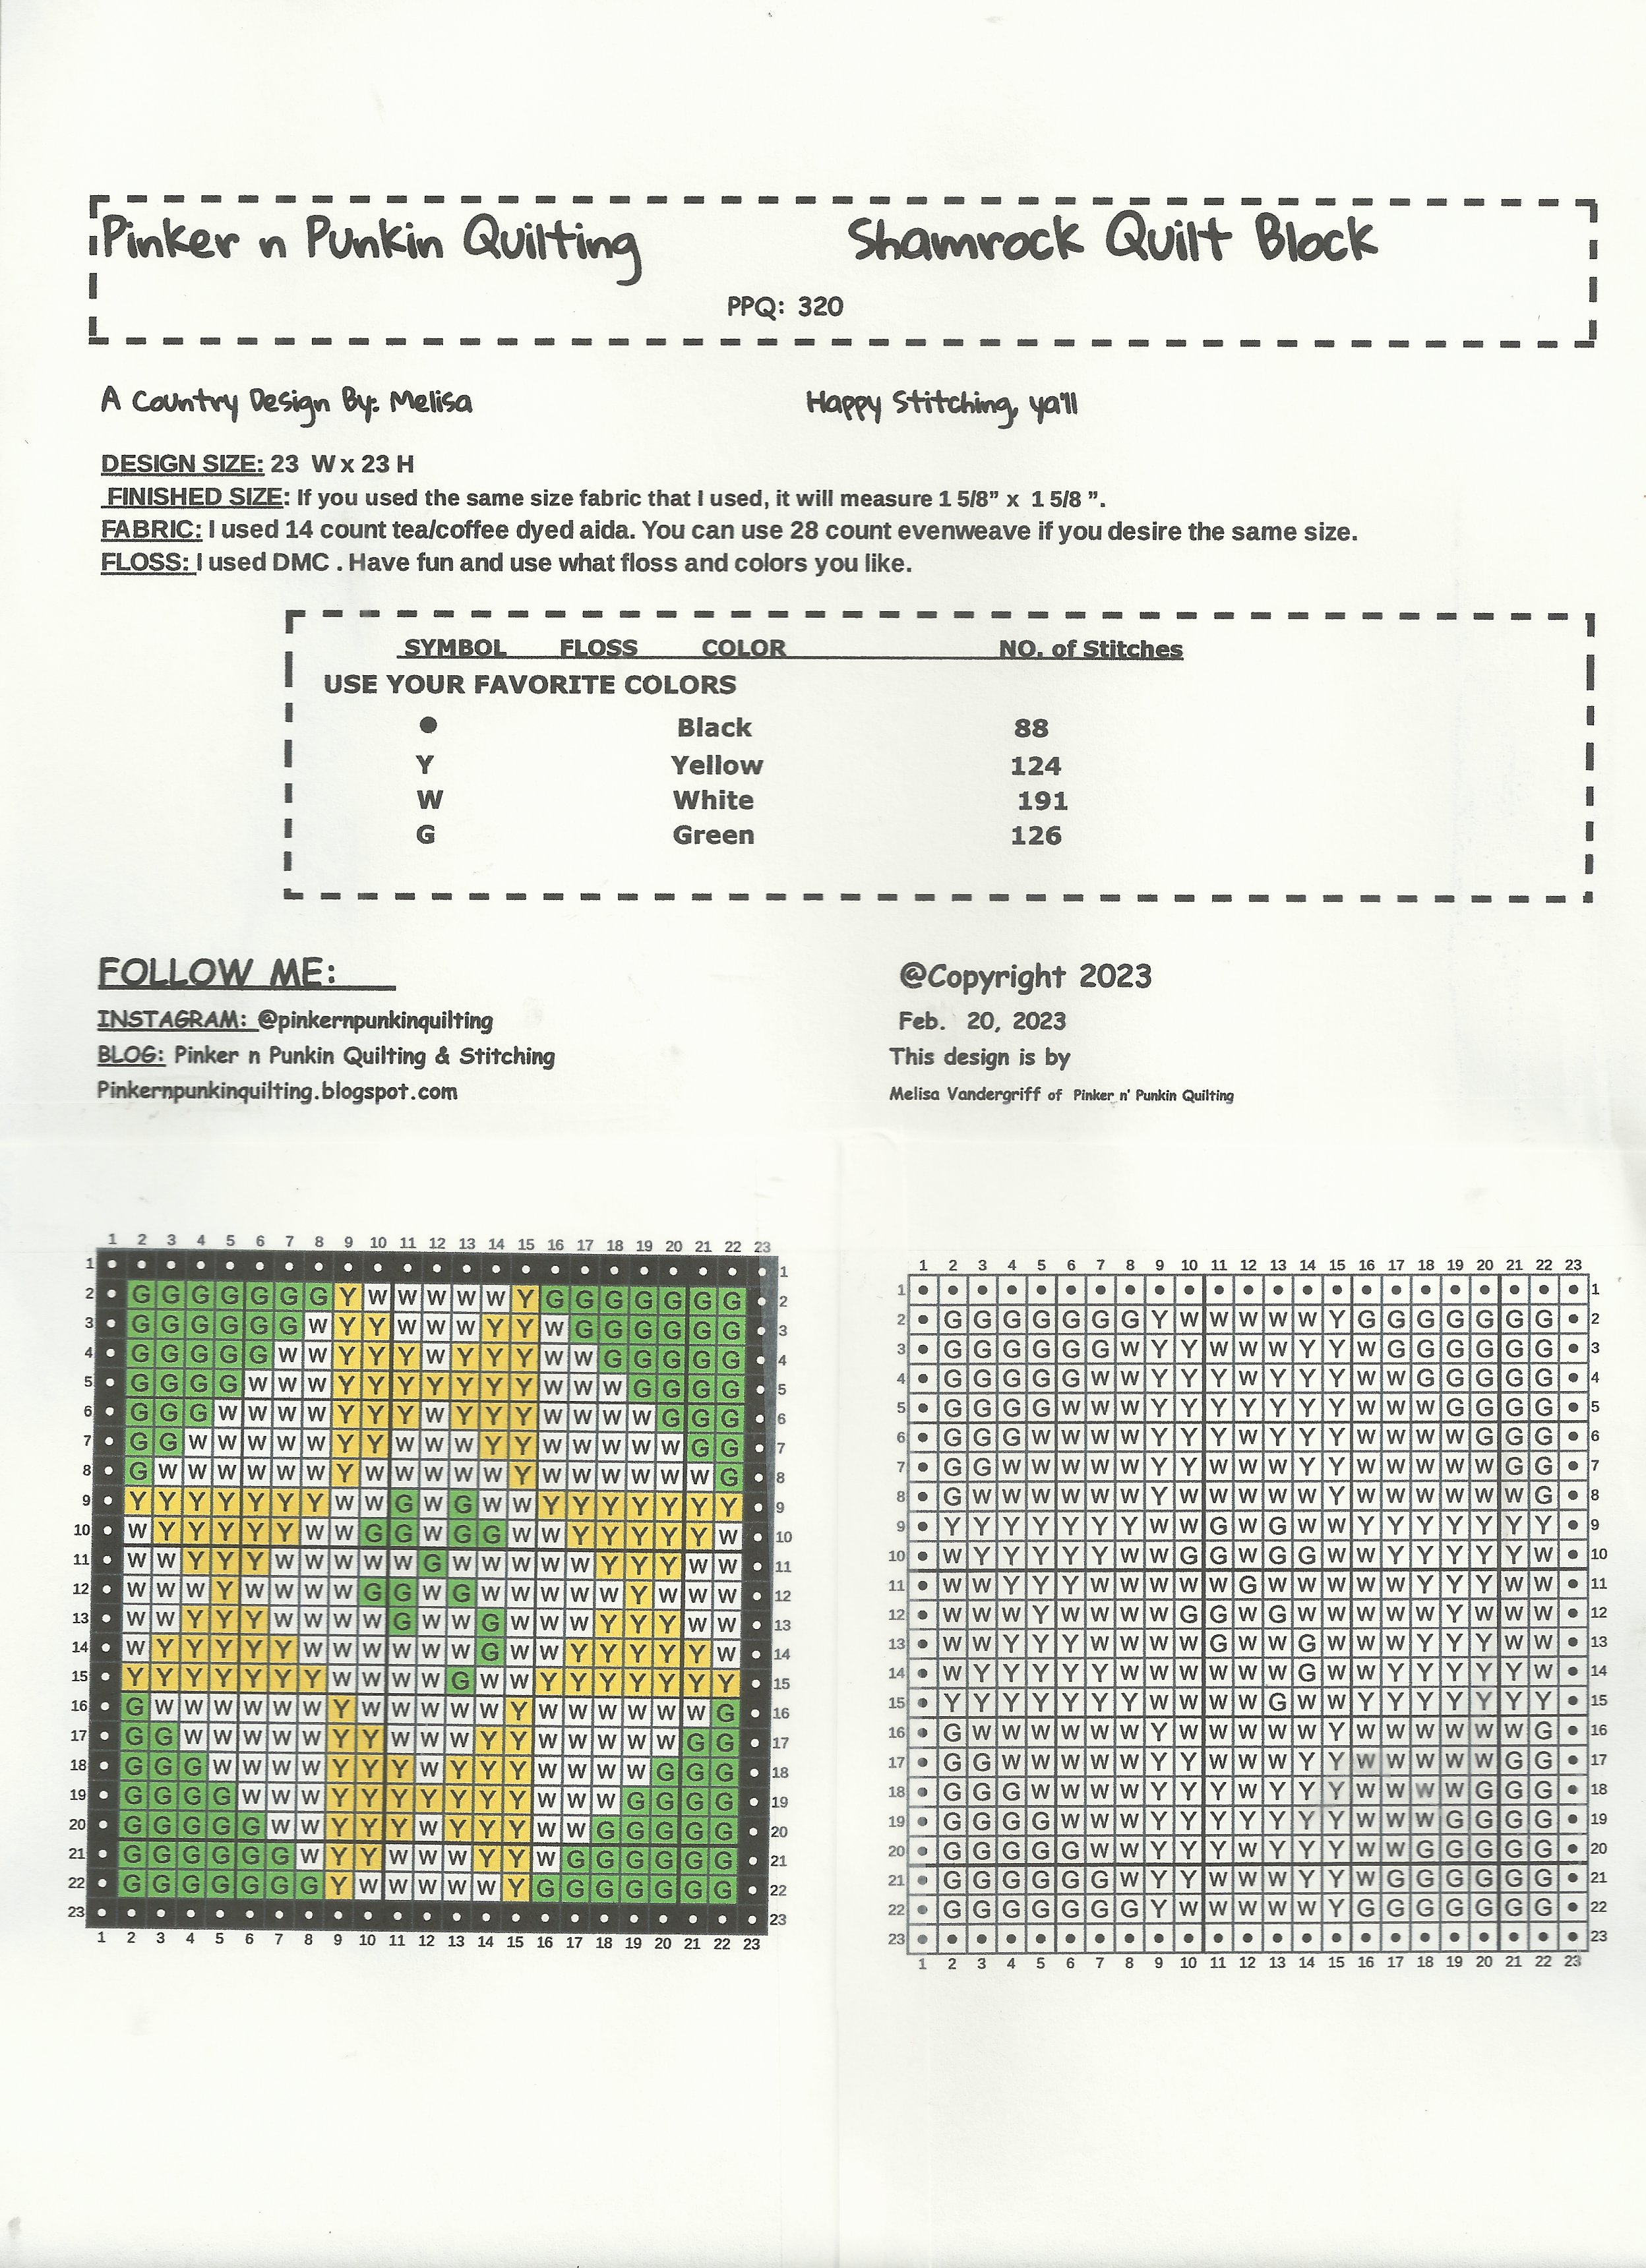
 I whipped this Shamrock Quilt Block up all why watching my favorite  super sleuth , Columbo who solved a  mystery all within a 2 hour span. He is amazing!!!   You can see how small it is compared to the nickle. Mine is stitched on 14 count aida. 


Earlier this month, I found a wooden chalkboard house at the Dollar Tree and just knew it would be perfect for a future finish.

So would you like to help me finish it? I sure would appreciate all the help I can get. Some of you may remember that I have confessed  in the past that I am not great at finishing, but I do try. Anywhoo !!! As we are finishing, please promise to not call the FCP's on me. Who is the FCP' you ask? Well you know- the Finishing Cross Stitch Police who just might throw me in jail and toss away the key. ๐Ÿ‘ฎ๐Ÿš“๐Ÿšจ๐Ÿ˜€

I  will gather  up our  supplies for finishing which includes some clips, batting and fabric  and Aelene's tacky glue.  I do not always have mat or foam board to work with and when I do not have those items, I just use a thick cardboard. If the cardboard is not thick enough I layer a couple of pieces together and glue them with Aelene's tacky glue. So if you do not mind, cut   3 pieces of cardboard measuring 2",  2 1/2" and 3". 

Now we are ready to get to the fun part. As I press the stitch, you can cut 2 layers of scrap batting for the 2" cardboard. Then  center the stitch onto the batting covered cardboard and glue. Yes I said glue the stitch to the piece. ๐Ÿ˜ฒ๐Ÿ˜ฑ Just turn the edges over to the back of the finishing board and add a thin line of glue. This is just a quick stitch so I am ok with glue rather than lacing, but you certainly can lace yours if you want.  


While you are doing that , I am going to take 2 old green shirts and cut some  fabric for the 2  1/2" and 3" square and then cover those. I just fold the edges of the fabric to the back and add a thin line of glue and tack the fabric  down.  I often use clips or clothespins to help keep everything in place as the glue dries. 

 Now that we have all 3 boards covered, we simply layer them in a pleasing manner and glue them together. 

Today I have my trusty ole' cast iron to weight them down as they dry, but I will put a piece a fabric over my finishing piece so the old iron doesn't touch the stitch. You can also use a stack of books.  

Now for the little house, I think we should add a magnet to where we want to put our stitch . Let's use the glue gun to add the magnet just in case I want to use the house for another piece. What do you think? 

 I can then add a washer to the back of the cross stitch and change out the cross stitch monthly. You know what that means- I will need to make more of these little quilts for the holidays.๐Ÿ˜€

 I think our stitch is ready so if you add the piece to the house, I will grab some chalk and do a little doodling on the bottom of the chalkboard. Wahlah!!! our piece is complete. 

Oh what a joy it was that you was able to lend a hand. Thank you so much. I could not have done it without you.  

If you are interested in stitching Shamrock Quilt Block  ,grab the images below. Many of ya'll know but I always encourage you to read my little disclaimer and note about getting my charts. 

NOTE: Normally I have been able to create links to the charts and instructions which were in JPG form. For some reason, recent updates on Google Docs. has prevented me from doing that and I am not able to create a pdf without having to deal with storage issues.  Many dear stitchers say they right click, save the image and then print.  I think some have copied and pasted it to a Word document that they can print off as well. I hope you are able to find a way to enjoy this chart. You will have to click each page to save. Thank you so much for your patience and understanding and for all of the helpful tips and ideas. 

I stitch my little designs for fun and to decorate my home. I feel very blessed by this community and love sharing my little charts, but I am not a professional designer. And I do not have professional software. Thank you for understanding . I am always grateful for your kind encouragement , your visits, and for stitching my little designs.


This is a choose your own color stitch , but if you are interested in the floss colors I used they are DMC 3346, white, black and 782. 

☘   ☘   ☘   ☘   ☘   ☘   ☘   ☘   ☘   ☘   ☘   ☘  ☘   ☘   

Now speaking of finishes , I wanted to share my 4th Christmas finish for the year. This is just one of the charts that sweet Stacy sent me. "Love" is from the  Advent Candles Ornaments from Heartstring Samplery  I finished it similar to the way Beth did. I loved it so much. Thank you my dear friend. Bear hugs to you.๐Ÿงธ๐Ÿค—  I am including this in   #12in23ornamentstitchalong hosted by Carol at Stitching Dreams.


Wishing you the most beautiful day!!! Thank you for the sweet visit!๐Ÿค—☘

As always,

Happy Stitching and Quilting, ya'll

Melisa

Sometimes the smallest things take up the most room in your heart. - Winnie the Pooh. 

Hugs and Stitches!!! ๐Ÿค—๐Ÿงต

Dedicated to my dear sister, Amy. I love and miss you so much. ❤❤

Friday, February 24, 2023

Just a Quilting Along

Fabrics are pulled !!! I have been pulling some fabrics for Barbara Brackman's QAL. 


Welcome, ya'll. Is this pink as pretty as a posy?  I sure think so. 

 I pulled it  to use in Barbara's Atlanta Garden Quilt. Block # 2 Grandmother's Choice  was posted on Feb. 8, 2023 .  Barbara gives you the measurements to make the choice of 2 sizes. I am creating 10" blocks. 


Such a lovely block. 

 Block #1  in the Atlanta Garden Quilt is called  Garden of Eden. 


Earlier this month, Kathleen Tracy of  A Sentimental Quilter hosted a free Valentine's QAL in 3 easy steps. The end result was a darling quilt called Love Letters

I am quite smitten over the sweet envelopes.  It was such a joy that Kathleen broke  down the steps over a few days; it felt like I was piecing along with her. ๐Ÿค—  As of right now , it is still available on her blog , the final step was posted in her Feb. 6, 2023 post.  This will be going in the hoop soon. 

I have a few farm doodles for you. 


Luv Ewe , Luv Chick,  and Luv Moo were stitched in  2021. I usually pull them out in February and leave them out as little bowl fillers until Fall. Some new additions will be quite nice. I will be working on them today. 


Though it is not Thursday, I am still working on a bit of embroidery

I am dreaming of a new Embroidery Stitch Along. Last year I shared the Summer Days embroidered blocks over several weeks.

 It was a slow paced enjoyable stitch for me .

 I bought a couple of yards of white fabric for embroidery with some ideas in mind. Are you game for another one. 

Let me give you a hint as to what I am thinking of embroidering.๐Ÿ‘‡๐Ÿ”

That's my Friday ramble! May your day be filled with blessings, love and all of the stitching and quilting your heart desires. Hugs and love and 


As always...

Happy  Stitching and Quilting, ya'll

Melisa

Try to be a rainbow in someone else's cloud. 

Hugs and Stitches!!!!๐Ÿค—๐Ÿงต❤

Dedicated to my dear baby sister, Amy. I love and miss you, Amo. 

I finished my Shamrock Mini Sampler that I shared Wednesday. 

 Smores and Campfire!!!  Eeeh! Mr. Pinker and I are headed out on our 1st camping adventure of year. 

I am joining these lovely ladies' link parties. I hope you check them out; they always have so many wonderful projects going on and provide the opportunity for other needleworkers to meet. 

Pat at  Life in  the Scrapatch for Stitch , Sew and Show- Wednesday

Jennifer at Inquiring Quilter for Wednesday  Wait Loss- Wednesday

Denise at For the Love of Geese for Put Your Foot Down- Thursday

Kelly at My Quilt Infatuation for Needle and Thread Thursday- Thursday

TGIFF at Melva Loves Scraps for Thank Goodness Its Finished Friday- Friday

Nina at Creations, Quilts, Art , Whatever by Nina for Off the Wall Friday

Alycia's of Alycia's Quilts for Finished of Not Friday

Michelle  at From Bolt to Beauty for Beauty Pageant - Friday

Wendy at Wendy's Quilts for Peacock Party - Friday

Sarah at  Confessions of a Fabric Addict  for Whoop! Whoop! - Friday

Frederique at   Quilting Patchwork Applique for Patchwork & Quilts - Saturday

Angela of  So Scrappy  for Scrap Happy Saturday

Wednesday, February 22, 2023

Sweet Berry Pickers An Embroidery Freebie

Hello there , Sweetness and a berry good day to you!!!

  Today is the last day of the Sweet on You Blog Hop hosted by Joan at MooseStash Quilting. What a lovely hop it has been.  ๐Ÿ“❤๐Ÿค—


 Today we are going to hop out to the  strawberry field.  You may remember that our crop was cut to over  half in size last year. Normally we have 1  1/2 to 2 acres of 3 different types of strawberries.  The plants are certainly growing.    

I am already dreaming of baskets of juicy sweet berries, but I will have to wait because our season does not start until late April. 


Meanwhile, I have been enjoying  embroidering some strawberries and 2 sweet pickers. May I introduce to you the Strawberry Pickers? Two little birdies that do enjoy their sweets .   ๐Ÿ“


 If you are interested in creating your own small wall hanging,  just grab the images below and resize them if need be. I have also provided the directions on how I created my quilt.  ๐Ÿ“


             ๐Ÿ“  ๐Ÿ“   ๐Ÿ“   ๐Ÿ“   ๐Ÿ“   ๐Ÿ“   ๐Ÿ“   ๐Ÿ“

If you would like to make a quilt like mine, grab some pretty red fabrics and your embroidered blocks and don't forget the directions which are down below.

I no time  you  can have your own pair of strawberry pickers. ๐Ÿค— ๐Ÿ“


DIRECTIONS: 

๐Ÿ“1. Cut out 4 background fabrics 7 " square. Using a light box or the window, trace the designs onto your fabrics and embroider using your favorite method. I used  the backstitch  with 2 strands of DMC 498  . A French knot was  used for the  birdie eyes. 


 ๐Ÿ“2. Trim you blocks to 5 1/2" square.   
๐Ÿ“3. From assorted reds  , CUT 8- 2" x 5 1/2" strips. 
CUT 8 - 2" x 8" strips. 
๐Ÿ“4.  Using the photo as a reference , you will construct 2 blocks like   BLOCK A and 2 like  BLOCK B. I would lay out the strips and embroidered blocks beforehand looking at the placement of fabrics.  Use a 1/4" seam allowance and press seams once pieced. 


๐Ÿ“  ๐Ÿ“   ๐Ÿ“   ๐Ÿ“   ๐Ÿ“   ๐Ÿ“   ๐Ÿ“   ๐Ÿ“


๐Ÿ“5. After piecing the blocks , sew the 4 blocks together. 

๐Ÿ“6. Your sweet berry pickers are now complete.  If you wanted, you could extend the quilt by adding an outer border; otherwise just quilt as desired. 


Doesn't the berry pickers look adorable? I can not wait to use it during strawberry season. 
You have a berry nice day and thank you for the sweet Friday visit. 
Don't forget to check out the other ladies on the blog hop . You are sure to find inspiration. 


Dedicated to my sweet berry picking sister, Amy. Berry season will not be the same. Love ya, Amo. ๐Ÿ“๐Ÿงบ❤๐Ÿ‘ผ


Biscuits and A Sampler - A St. Patrick's Day Freebie

Butter my buns and call me a biscuit!!! 

It's Wednesday already - how did that happen!!! 

Good  morning ya'll . Is that a growling tummy that I hear? Maybe its my own .๐Ÿ˜‹ I have a hankering for biscuits. How about you? Well just grab an apron .I am not too shy to ask for help in the kitchen . ๐Ÿ˜„ Now come on; I promise I won't ask you to wash the  dishes. 

I have bookoos of biscuit recipes. 

Now the ones we are making today are not the biscuits that I showed a couple of weeks ago , but they are sure to quiet the rumbly in your tumbly .

 This is a 2 ingredient recipe and quick to prepare as well. 

 Ok, you grab a bowl, and I will get what we need out of the fridge and pantry-

 Hmmm we need heavy cream and flour.  We will use Granny's old rolling pin. It looks pretty rough, but it does the job perfectly. It's my favorite rolling pin.๐Ÿค— 

We can't start without the recipe can we?  You can grab the image and print the recipe - Sorry it scanned sorta cockeyed. 


Preheat the oven to 450 degrees. Do you mind if I get a pinch of the yummy raw dough? 


Pat and roll! 

Mason jar lids are great to use as biscuit cutters.  Another tip from Nanny. 

Nanny always said "Don't twist the cutter but push it into the dough".


Two skillets ready to go into the oven. 

While the biscuits are in the oven, let me show you what I am working on now.  It is another mini sampler but this one is for St. Patrick's Day. Just a simple lower case alphabet with a few shamrocks.

I have high hopes to finish it by evening. If you would like to join me and stitch one yourself, then grab the chart and your favorite green floss and then you can go to town on it. 

UPDATE: I finished my Mini Sampler . It came  out cuter than I imagined. 

If you are interested in stitching St. Patrick's Mini Sampler  ,grab the images below. Many of ya'll know but I always encourage you to read my little disclaimer and note about getting my charts. 

NOTE: Normally I have been able to create links to the charts and instructions which were in JPG form. For some reason, recent updates on Google Docs. has prevented me from doing that and I am not able to create a pdf without having to deal with storage issues.  Many dear stitchers say they right click, save the image and then print.  I think some have copied and pasted it to a Word document that they can print off as well. I hope you are able to find a way to enjoy this chart. You will have to click each page to save. Thank you so much for your patience and understanding and for all of the helpful tips and ideas. 

I stitch my little designs for fun and to decorate my home. I feel very blessed by this community and love sharing my little charts, but I am not a professional designer. And I do not have professional software. Thank you for understanding . I am always grateful for your kind encouragement , your visits, and for stitching my little designs.


I think our biscuits are about ready.  Don't those look mouthwatering.  Oh, shucks! They didn't rise as high as I had hoped .

 NANNY's BISCUIT TIP  # 200 - Pack the biscuits close together.

Sorry Nanny, I'll do better next time. Lol.  My Nanny was an amazing Southern cook. 

 Grab you a plate and mug of milk. I even have honey from our on bees.  

Let's dig in and eat and then we will go stitch. 

I  am so happy that you dropped by and spent some time with me today. ๐Ÿค—

More biscuit recipes will soon follow. 

I appreciate the sweet Wednesday visit. 
As Always...

Happy  Stitching and Quilting, ya'll

Melisa


Creative clutter is better than idle neatness. 

Hugs and Stitches!!!!๐Ÿค—๐Ÿงต❤

Dedicated to my baby sister , Amy who loved to cook and grocery shop just as much as Nanny did.   Love and miss you, Amo. 

Candy dish of old biscuit cutters. Some were gifted to me by my sis. 


Popular Posts

Chicks and Bunnies Easter Hutch Tour