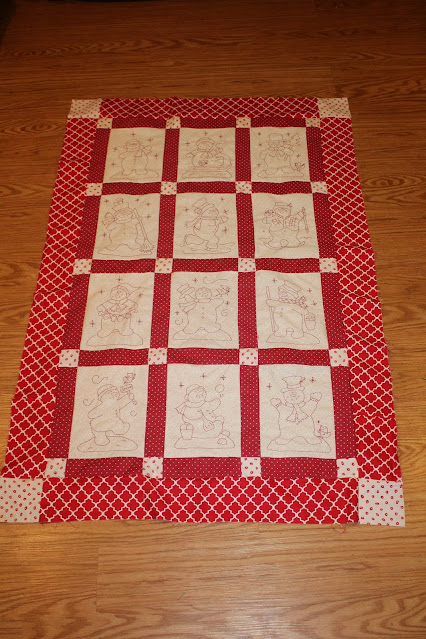
Good Thursday, morning!! I can not believe Frosty is completed!! All the blocks have been wrestled into a top.
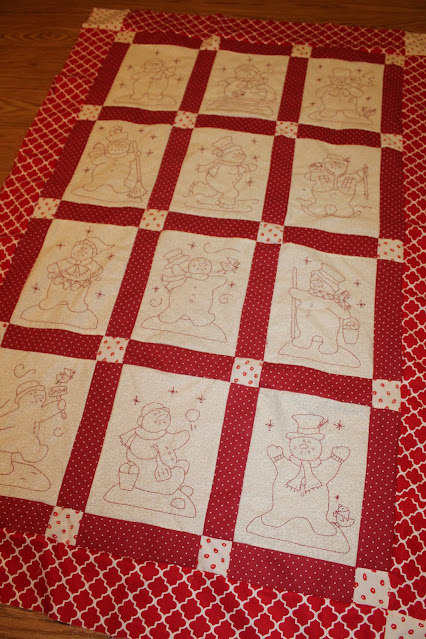
12 Frosty blocks in no particular order. Now to finish mine.

I trimmed my blocks to 7 1/2" x 10 1/2" making sure that the embroidery work was not in the 1/4" seam allowance. The way that I trim mine is I find the center of the block . So for example if I need to remove 1 " from the width of the block , I would trim 1/2" from right and left edge.
Now if you find that all of your blocks are the same size and you do not want to trim them , then you certainly do not have to. If you are adding sashings and borders like I am , you would just have to adjust the size of the strips.
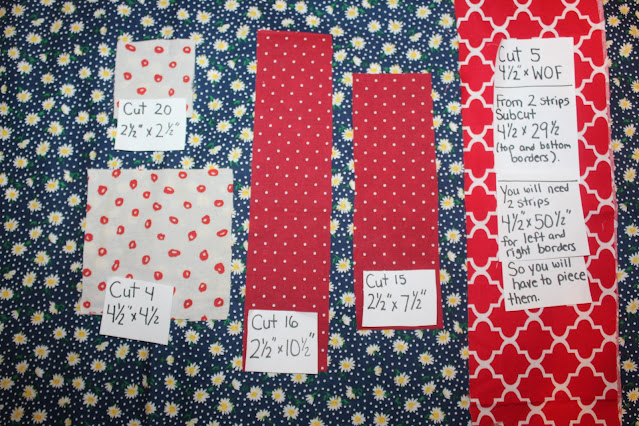
This is the fabrics and measurements that I used to piece mine.
After trimming, I cut out the fabrics I would need for my sashing and borders
FOR SASHING
For the corner squares : Cut 20 - 2 1/2" x 2 1/2" ( white fabric)
For bottom/ top sashings : Cut 15 - 2 1/2" x 7 1/2" ( red fabric)
For side sashings: Cut 16 - 2 1/2" x 10 1/2" ( red fabric)
Layout blocks and sashing.
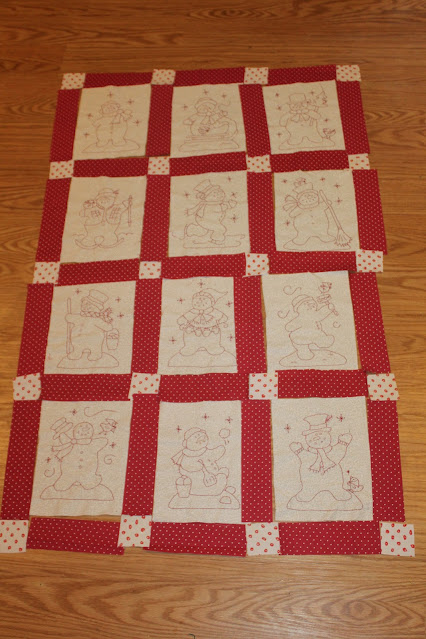
Piece rows together using a 1/4" seam allowance. Press.

OUTER BORDERS:
I cut 5 strips of fabric for my outer border though I could have only used 4. The reason I cut 5 was because I was trying to match the design motif in the border fabric as best as possible. You may want to wait about cutting the 5th strip until you piece together the left and right border to see if you have enough fabric cut already ( lol I'm thrifty like that) .
For corner blocks- Cut 4 - 4 1/2" x 4 1/2" ( white fabric)
For borders- Cut 4 - 4 1/2" x WOF (width of fabric) (red patterned fabric)
Subcut 2 strips to 4 1/2" x 29 1/2" ( top and bottom border)
Now we are going to prepare the right and left borders.
From the leftover fabric from the subcut of the top/bottom border , piece to the 2 remaining 4 1/2 x WOF strips .
Subcut those 2 strips to 41/2" x 50 1/2" for the left and right border .
Layout corner blocks , border and pieced quilt ( like photo below) Piece together.
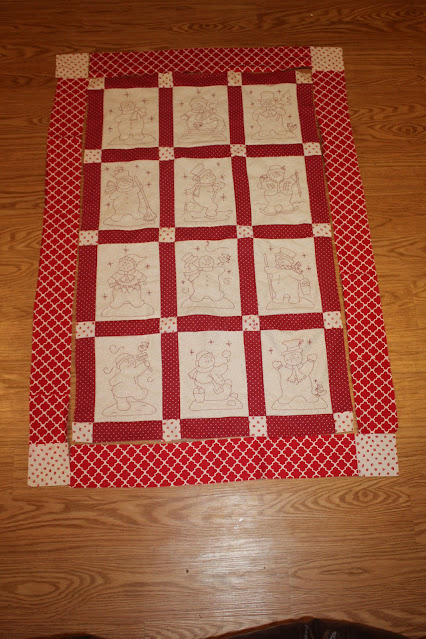
And Frosty is now a completed top. On to the quilting!!! Woo Hoo!
Meanwhile, I plan on working on some embroidered Valentine's today.
Two have been stitched. I still have to figure out how to complete them. Some ideas are brewing.
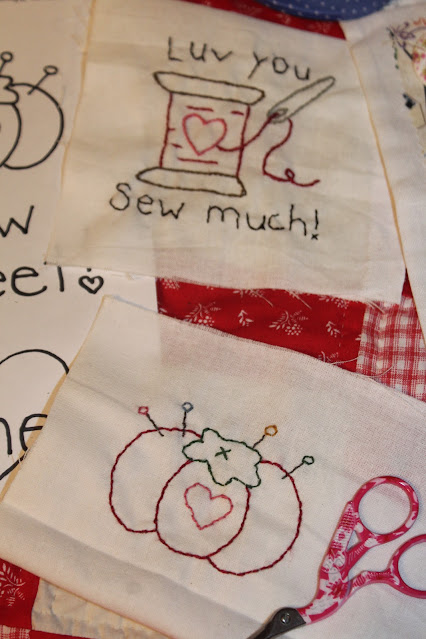
Click here for the Valentine doodles.

I want to thank all of you who have followed me along on the Frosty journey , for all of the kind words and encouragement and for all of those who stitched Frosty as well. It has been such a joy.
Have a fantastic day, my friends and as always...
Happy quilting,
Melisa
Never let a stumble in the road be the end of a journey,
Hugs and Stitches!!!
Dedicated to my dear sis, Amy . Love ya.
If you have missed any of the previous blocks , just click on the names and you will be transported back to the posts.
They include: " Let it Snow" and " Sled Time , The Tree March and "Just a Sweeping!!!" , " Chasing Snowflakes" , " Learning to Ski " , Mittens for Sale , Blown Away , Snowball Hunt , The March , Playtime, and Winter Time.


Frosty McChill flimsy is ADORABLE. I am a sucker for anything red, especially redwork and polka dots. You made me smile this morning...thank you for bringing me good cheer...needed the motivation 😍
ReplyDeleteFrosty is gorgeous, Melissa. The polka dot fabric is perfect.
ReplyDeleteLook 👀 how cute!!!!! Absolutely adorable!
ReplyDeleteOh Melisa, your Frosty McChill quilt top is so darling. Well done! What perfect fabrics you picked for the sashing and borders!
ReplyDeleteLove this quilt!
ReplyDeleteI am so excited to be working on this quilt as well. I had a short delay in mine as I got admitted to the hospital with covid, but i am home now and on the mend. So, I look forward to getting back to embroidery again. Your quilt turned out so cute! Just love the red. I may have to do another one in reds.
ReplyDeleteIt's adorable, Melisa. I'm almost finished stitching the final block and I'll put my quilt together, as well.
ReplyDeleteFrosty McChill Quilt is so adorable! I was going to use some sledding and skating fabrics but I think I need to add some red and polka dots for sure! Thank you, thank you for all of your hard work and wonderful design ideas. Sounds like you are going to hand quilt but I think that I will quilt on my domestic, but maybe, a little hand quilting is the ticket. I need to ponder. Have a wonderful weekend, sending hugs to you from Arizona.
ReplyDeleteThis was a lot of fun. Thank you very much for the adorable Frosty McChill and all his antics. This will make a sweeet quilt
ReplyDeleteLove your Frosties, and so nice to see them pop up on other blogs too.
ReplyDeleteFrosties is such a fun quilt. Congrats on all the progress.
ReplyDeleteMelisa - Your quilt finish is just adorable. Love the colors - I hope to get my top finished this week! Are you hand quilting yours?
ReplyDeleteThanks so much for the Frosty McChill patterns, I was looking for a winter project and this will be perfect. https://www.craftygardener.ca/embroidery-stitch-book/
ReplyDeleteAaah you are so welcome, Linda and thank you so much for choosing Frosty as a winter project. I so hope you enjoy stitching him. Have a wonderful week and thank you for the sweet visit.
DeleteThanks for all the patterns you share, and these Valentine ones today. =)
ReplyDeleteWhere can I get the snowmen squares
ReplyDelete