Blog Archive

Thursday, November 12, 2020

Christmas Goat- A Barnyard Christmas Freebie

 Hello, dear friends! Well  here we are on the last of the Barnyard Christmas series (or at least for now) .   Were you trying to guess what would be the next farmyard critter?  Well let me introduce you to Ruby, the Christmas goat, though hubby thought she looked more like a reindeer.  On this snowy day, Ruby is pulling a little cart with Frosty the  snowman and Henrietta in tow.

We never really had many goats on the family farm, but about 18 years ago we did have one where I reside now and her name was Ruby. Ruby ate about everything and loved to go up and down the hill near the woods where her job was to  clear out an overgrown area. She did her job well. My girls loved to go out and look at Ruby,  but they never took care of her. Ruby stayed for a short time until a better home was found for her, and though she is gone, she  remains in my heart . 


This is a small stitch measuring the same as the others in the series at 31 x 31. I stitched mine on 14 count aida which would give it a size of 2 1/4" x 2 1/4". 

There are a couple of difference in my 2 stitches. I charted the snowman wearing a green scarf and Ruby sporting a green collar. On the tea dyed aida, I decided to stitch them in red. 

If you are interested in stitching Ruby and her crew , check out the pdfs below . Each page is on a separate pdf. 


For the instruction page, click here

For the colored chart pdf, click here .


For the black and white, chart click here .


If you missed any of the other charts, you can click on the names below and you will be directed to those charts.  

Previous charts include: 

Chicken Sled ,   Santa's Ride ,  Special Delivery , Christmas BarnChristmas BucketChristmas Tractor , Santa on the Farm,  Mrs. Claus on the Farm , The Stockings Were Hung ,   Santa's Visit  ,  Hanging the Star .   , Skiing on the Farm  Farm Truck  and Baking on the Farm.

Now that all of the ornaments are completed, it is time to put up the Christmas tree  and start decorating. I hope to share my tree with you soon. 

 I truly hope you enjoy this little chart. Thank you so much for visiting me . Have a lovely rest of the week and as always... 

Happy stitching, ya'll

Melisa

I would love to see your stitch. You can always direct message me on Instagram or use #pinkernpunkinquilting . I have enjoyed seeing all of the different versions of the Barnyard stitches and the finishes. Your creativity inspires and motivates me. 


Sunday, November 8, 2020

Turkey Invasion- A Little Fall Hutch Decor

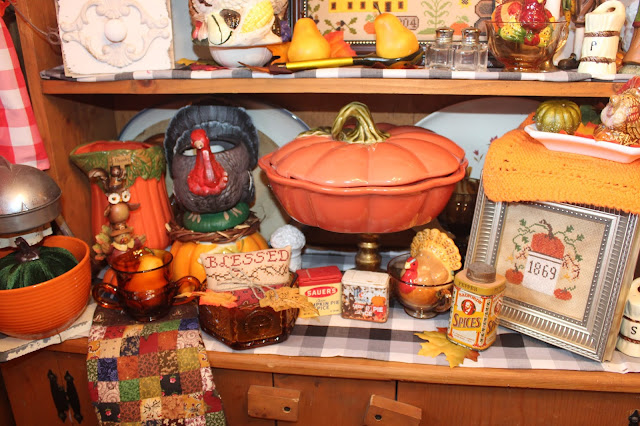
Hello dear friends! I am so happy that you have dropped in for a visit. Pumpkin Cookie Bars are in the oven , and I have iced tea ( a Southern favorite) or milk.  As you step into the kitchen you can see that a flock of turkeys have invaded!


My obsession in collecting turkeys probably started in the early 2000's. I had never seen a wild turkey in person until my hubby introduced them to me years ago. He has worked for years in the conservation of turkeys in our area so how appropriate for me to want to collect a few. Every year I try to find at least one. Some years I am successful ; some years I am not. I had pretty much expected to not find a turkey this year with all that is going on in the world and  with limited shopping experiences, but I did find a turkey at a thrift shop during the summer.  I was jumping up and down when I found this little guy for a couple of dollars.  
He is a little planter and is quite handsome if I do say so myself. 

My hutch is overfilled with turkey and all things fall including a few fall stitches. 
On the top shelf is a Primitive Hare freebie cross stitch called "Give Thanks " and can be found on the website.  The Autumn cross stitch pillow is also a freebie from The Stitcherhood and can be found on their website.  I completed both of these last year. 

Add caption
Years ago I got the little turkey pie plate from the Goodwill . I have yet to bake a pie in it , but it is fun to bring out each  November.  My sister gave me the amber colored bowl and glass cup. She knows I like to collect them . 

The second shelf has a few more turkeys. I would say  you could serve gravy in at least one of these guys. 

The yellow house stitch is one of my favorites that I completed last year  and is called "Autumn at Sunflower Ridge" by The Woolly Ewe.  I chose my own colors in this piece.


 Since this was the 400th year anniversary of the Pilgrims' arrival in America I had to have my Pilgrims on display as well. 
The third shelf includes a regal turkey planter, a pumpkin pitcher and a pumpkin pie plate sitting on a golden vintage compote stand.

The Blessed cross stitch was a freebie on my blog and you can find it here.  

I love to collect old tins and that includes these old spice tins - one of which was found in the dump on the farm. 


The Pumpkin Crock cross stitch is one of my designs that I worked on this year as well. 

I have been in the quilting mood lately and worked on this scrappy quilt made up of 1" blocks in October.


 This little quilt is perfect to drape off the edge of the  hutch. The colors are so warm and pretty, and it brings a smile to my face each time that I see it.


Below the hutch is an old Eagle Snack Mix tin which is filled with Christmas bowls waiting to escape. On top of the tin,  is a "Give Thanks" truck from Hobby Lobby my daughter gifted me. I am going to paint wheels on the other side so that I can display it out of the fall season.   My sister found that big rusty spring on a farm dump site last year and she knew  I would do something with it. She was right. On the big rusty spring is a scoop  with a wooden painted turkey. Isn't he just the cutest decked out in his Pilgrim attire?  I usually put something seasonal in the scoop. 

Now let's pop over to what I call the "Rooster Table" . I was rummaging around the garage and found this white piece of wood that fit perfectly on top of the Rooster Table. I just wanted to lighten it up a bit. I can remove it when I want  so there is no commitment which is great for me. 
Everything is a thrift store find except for the  Thankful house and the cross stitches  which were completed in 2019. One  is a Hands on Design piece called "  A Year in Chalk November." It is one of my favorites. I finished it on thrifted wood plaque , used  some twigs and acorns from the yard added a fabric bow and called it a finish. 


 The other cross stitch is from With Thy Needle and Thread and is called  "Holiday Hoopla Thanksgiving"  . I finished it into a little tart tin to make it look like a turkey pot pie.  

The subway art hanging on the wall was a free printable years ago, but I can not remember from who.  I enjoy bringing it out each year.
I have more turkeys tucked here and there in the kitchen and foyer, but I will save them for a future post. Like I said the turkeys have invaded!

The Pumpkin Cookie Bars are just about ready and here is the recipe.They are a little time consuming but yummy just the same. 

Pumpkin Cookie Bars
Ingredients
1 cup of flour
1/2  cup of quick oats
1/4 cup of firmly packed brown sugar
1/4 cup of chopped nuts
1 3/4 t cinnamon
1/2 c melted butter
1 c of Libby's Solid Pack Pumpkin
3/4 cup of undiluted Carnation Evaporated Milk
1 slightly beaten egg
1/3 c of sugar
1/2 t. of allspice
1/4 t salt
1 - 8 ounce package of cream cheese
1/4 c orange marmalade 

Directions: Preheat oven to 350 degrees. Combine flour, oats, brown sugar, nuts and 1 teaspoon of cinnamon. Add butter and mix until crumbly. Press into bottom of 13x 9 x 2 inch baking dish. Bake for 20-25 minutes. Remove from oven . Reduce oven temperature to 325 degrees. Combine remaining ingredients EXCEPT the cream cheese and marmalade ( which are for the topping) Pour over the crust.  Bake in the oven for 25-30 minutes or until toothpick inserted in center comes out clean. Cool completely.  To make cream cheese topping, beat together until fluffy one 8 ounce package of softened cream cheese and 1/4 c of orange marmalade. Spread over cooled bars to frost. Garnish with crushed granola, chopped nuts or orange peel.  Cut into bars. Yield 32. 

Time for me to go do a little finishing today ,and hopefully I will have some new stitches to add to the Thanksgiving collection soon. Thank you so much for visiting me and checking out my Thanksgiving hutch.  
Have a blessed day. 
 Melisa

Friday, November 6, 2020

Gobble , Gobble - Turkey Creek Manor- A Fall Freebie

Gobble Gobble! Are you getting ready for that big day of eating? I can not wait. Mom always fixes the best turkey and dressing; it is so moist. My daughter has already put in her requests for a big batch of macaroni and cheese  and rolls .  Of course we have mashed potatoes, deviled eggs, green bean casserole and so much more. To be honest , we eat till our bellies pop. 


Usually, the family gathers at moms to eat and watch the kiddos play. Later in the evening we are  off to Mr. Pinker n' Punkin's parents where we will gobble up some more. 

Well I have been buzzing all around trying to get the Thanksgiving decor up in the kitchen and foyer and Christmas in all the other rooms. 

I still have some tweaking to do. But it is coming along. 


Yes ! I decorate for two holidays at the same time but hey, at least they are in separate rooms. Lol. 


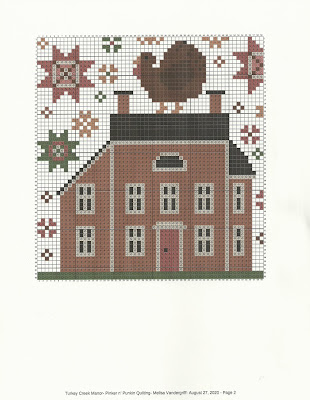
For the last couple of years ,I have been trying to build up my Thanksgiving stitching. I do not have a lot , but I am working on it. I love turkeys.  I had never seen a wild turkey in person until I met my hubby. Now I see them all the time in the fields across from the road.  They are fun to see. Of course we always try to count how many there are.  Well anyway, I decided my next house was going to have a turkey on top. This little stitch is called Turkey Creek Manor.

 Now, I have to admit I like my stitches sometimes to be a little "off" . Yep "off" .- See the house is not centered and the quilt blocks are falling of the edges on the top and right sides. Lol. That just makes me happy.    

This is a small stitch measuring 59 x 63. I stitched mine on 14 count aida which gives it a size of 4 1/4" x 4 1/2". 

I stitched Turkey Creek Manor using 9 DMC floss colors. They are 435, 310, 3033, 975, 355, 898, 3371, 3345, & 356.


I finished mine into a simple pillow just like I did the other houses that I have been working on. I am  working on house stitches for a big ole' dough bowl display in the future. 

If you would like to stitch Turkey Creek Manor, check out the pdf's below.  You could have it stitched up and out on display before Thanksgiving. Each page is on a separate pdf because of the devices that I use ( Remember I am not a professional designer; I am doing this for fun. )

For the instruction page,  click  here  .

For the color chart pdf , click here .


For the black and white  chart pdf, click here


If you missed the other houses ,click on the names to visit the posts. They are Crow Creek Saltbox, Willowisp Manor of Holler Lane, and Ophelia Manor of Punkin Holler Lane


Now how about a pumpkin recipe. Like I have said before, when it turns fall, I get in the mood to bake. Well this is a vintage  recipe from Libby's in 1982. It  is called Libby's Pumpkin Nut Bread. Yum Yum!

LIBBY' S PUMPKIN NUT BREAD

Ingredients: 

2 cups of sifted flour

2 t of baking powder

1/2 t. of baking soda

1 t of salt

1 t of ground cinnamon

1/2 t ground nutmeg

1 c of Libby's Solid Pack Pumpkin 

1 c of sugar

1/2 c of milk

2 eggs

1/4 c of butter or margarine softened

1 c of chopped walnuts or pecans

Directions:  Preheat oven to 350 degrees. Sift together first 6 ingredients. Combine pumpkin, milk , sugar and eggs in a mixing bowl. Add dry ingredients and butter.  Mix only until flour is softened. Stir in nuts. Bake in a well greased 9 x 5 x 3 " loaf pan for 65 minutes or until when a toothpick is inserted into the center that it comes out clean.  Cool for 10 minutes and remove from loaf pan. 


And now I am off to do a little baking myself and hopefully settle into a  little stitching . Hope you have a blessed day and thank you for visiting and as always...

Happy stitching, ya'll

Melisa


Monday, November 2, 2020

Baking on the Farm- A Barnyard Christmas Freebie

The kitchen is all a buzz on Christmas Eve as Mrs Claus, Paws, and Cluck are busy making Santa's favorite cookies.   Though I am sure after a long busy night delivering presents and eating cookies on his deliveries, he will be quite stuffed once he returns home to rest . 

Do you like to do a lot of baking during the Christmas season?  I do especially when family is over to visit. So I thought I would share one of  the family favorites. 


Magic Bars Chocolate Overload

Ingredients:  

1 box of brownie mix and called for ingredients for the mix

½  c semisweet chocolate chips

½  c peanut butter chips 

½  c peanuts

½ c Reeses Pieces

½ c M & M’s

½  c Heath Bar Toffee Bits

1 can of sweetened condensed milk

DIRECTIONS

Preheat oven to 350 degrees. Line 9 x 13”  pan with foil and grease  bottom and sides with butter or cooking spray. Make brownie mix as directed and press into pan.  Bake 35 to 38 minutes  or until when you insert a toothpick , it comes out clean. Bring out of the oven and layer the chocolate chips, peanut butter chips, peanuts ( or favorite nuts), Reese’s Pieces, M & M’s  and toffee Bits. Pour sweetened condensed milk over the top . Bake 18- 20 minutes until edges are golden brown and bubbling . Remove and place on cooling rack to cool for a few hours. Once cooled , cut into bars.


Doesn't that sound yummy? But like the name says- it is chocolate overload.


Now that your stomach is growling, let's talk about the stitching. Baking on the Farm is the 14th in the Barnyard Christmas series. It is the same size as the others measuring 31 x 31 which on 14 count aida would give a measurement of 2 1/4" x 2 1/4". What I call a quick stitch. 


I stitched 2 of these in an evening on 14 count aida. One was stitched on tea/ coffee dyed aida. The other was on Rit Emerald Green dyed aida that I dipped in a quick bath of tea. 


Did you notice the difference between the two? On the Emerald Green dyed aida stitch , I gave the little kitty a red bow by using 1 strand of DMC 498. I opted not to  put the bow on the tea/coffee dyed ornament. 


If you are interested in stitching Mrs. Claus and the gang, just check out the pdf's below. I have to put each page in separate pdfs because of the devices I am using. 


For Instruction page, click here


For the Colored pdf chart, click here


For the black and white chart pdf , click here


If you missed any of the other charts, you can click on the names below and you will be directed to those charts.  

Previous charts include: 

Chicken Sled ,   Santa's Ride ,  Special Delivery , Christmas BarnChristmas BucketChristmas Tractor , Santa on the Farm,  Mrs. Claus on the Farm , The Stockings Were Hung ,   Santa's Visit  ,  Hanging the Star .

   , Skiing on the Farm , and Farm Truck  .


 I truly hope you enjoy this little chart. Thank you so much for visiting me . Have a lovely rest of the week and as always... 

Happy stitching, ya'll

Melisa


I would love to see your stitch. You can always direct message me on Instagram or use #pinkernpunkinquilting .


Popular Posts

Summer At the Mill House