Blog Archive

Monday, October 12, 2020

Happy National Farmer's Day- A Little Farm Freebie

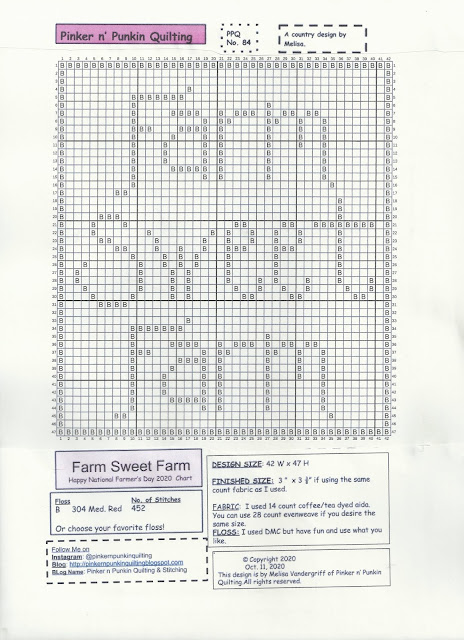
 Happy National Farmer's Day! Once called Old Farmer's Day, this is perfect opportunity to celebrate, praise and thank all of the farmers for their  hard work and dedication that they  put into our agricultural economy by raising the livestock , growing the foods and plants that we need . To celebrate I have provided this quick little freebie called "Farm Sweet Farm" .It is a simple quick little stitch that took me no more than an hour to stitch. 


This is a small with a design size of 42 x 47 . I stitched mine on a scrap of 14 count  tea/ coffee dyed aida which means if you stitched on the same size fabric it would measure 3 " x 3 3/8". 

I finished mine on a piece mat board wrapped in 2 layers of batting. The finishing fabric is a red and white gingham from the Goodwill. I then mounted mine on  a Dollar Tree blackboard. Pretty nifty and thrifty !  


Since I am getting ready for my farm Christmas decor, I added some Christmas pine boughs from a wreath, a red and white gingham ribbon  and jingle bell as embellishment, but I will remove that after Christmas so it will go in my everyday decor. 


I would love for you to stitch this little piece. Just click on the pdf  below and choose your favorite floss. I used DMC 304, but it would look fabulous in any color that fits your decor. 

Click here for the pdf. 


Thank you so much for dropping in and visiting and as always...

Happy stitching , ya'll

Melisa

I would love to see your stitch. You can always tag me on Instagram using #pinkernpunkinquilting or Direct Message me.  Have a beautiful day!

A Cup of Christmas Cheer - A Vintage Christmas Freebie - " Santa Mug"

Good Morning . Can I interest you in a cup of Christmas cheer? I know , I know . Some  of you are saying it is too early for Christmas, but I have Christmas on my mind all year long. 

My all time favorite items to bring out come Christmas time is my Santa mug collection. They are all carefully wrapped and tucked away in a special corner in storage waiting for that  wonderful, glorious day when they are unpacked, unwrapped and put on display.  Oh what a festive, happy day! I need to have that special day marked on my  calendar - and call it Santa Mug Day!!!  Lol  Well I had to have a Santa mug cross stitch to go with my mugs. So here is " A Vintage Christmas- A Cup of Christmas Cheer or Santa Mug"  
 
I am over the moon and tickled pink over this stitch . And Hip Hip Hooray! It is going to be on display on Santa Mug Day. I think my Santa Mug Day will be November 1st. Do you want to join me?  I have another question- Would you think I was crazy if I said I want to put up my Christmas decor up right now? Lol. Don't worry.  I will be good and refrain. It is not even Halloween yet. 


 Being curious and always a lover of useless facts or information.  I had to do a little research to find out more about these precious mugs. Can I tell you what I learned? 

These adorable Santa mugs were first introduced in 1949 as part of a fun Christmas decor and kitchen items series offered by the Holt -Howard Company. This company  was started with a $9000 loan from  the families of founders ,Grant Holt and brothers, Robert and John Howard.  Most of their business was done through department stores and catalogs.  Their little Santa mugs were so popular that eventually the company created everyday use coffee mugs.


 Wasn't that interesting? 


Here is a photo of my winking Santa Mug. 

 This set is  dated 1964. 


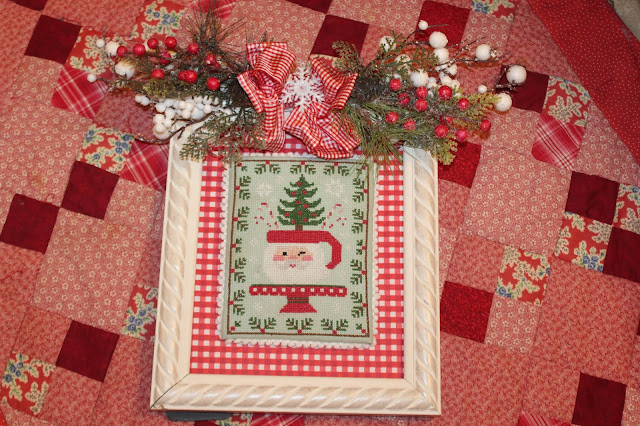
Now let me tell you about my stitch. My Santa mug is on a cheery red cake stand accented by green stripes.  The mug is filled with candy canes and a little Christmas tree with red balls. My mug is based on the winking Santa, but if you did not want your Santa to wink just stitch 2 open eyes.  Easy peasy. 
I stitched this on 14 count Rit Aquamarine dyed aida. I then boiled my aida in tea water for just a few minutes.  I used 8 DMC floss colors which are #353 , B5200, 898, 899, 304, 310, 986,and  762 , but you can use what ever colors your heart desires. I just stitched out of stash. 
The design size of this piece is  73 x 100.    On 14 count aida that would measure  5 1/4" x 7 1/8" , but I have to admit mine was a little smaller because my fabric shrunk during dyeing.  I finished mine in an 8 x 10" frame. I used red and white gingham fabric from the Goodwill as finishing fabric and a white pom pom trim around the edges. 
I used 4   $.98 Walmart  Christmas picks to embellish the top of the frame. I just wired them together and then added a red and white gingham bow . The final embellishment was  a small  snowflake ornament on top of the bow. 

I hope you consider stitching this piece. Because I am not too tech savvy, each page is in a separate pdf download starting with the instructions. 

For the instruction page , click here  .

For the color chart pdf, click here


For the black and white pdf  chart, click here


I have also provided a black and white larger print version of the chart. It is divided into 2 pdfs

For larger print of the  left side of mug click here


For the larger print of the right side of the mug, click here


Thank you all for coming to visit me and seeing what I am up to . I can not express how happy your visits make me .  May your day be filled with joy, love and happiness and as always...
Happy stitching, ya'll
Melisa


I would love to see your stitch. You can always direct message me on Instagram or use #pinkernpunkinquilting . 
I am not a professional designer, just a gal piddling around on her computer and wanting to share and thank this wonderful community. . I hope you enjoy this little creation. 


Sunday, October 11, 2020

Is there a tree in there? My Halloween Tree!

Hello, dear friends . Thank you for coming to visit me  on this rainy day. Come sit for a spell and let's look over my overfilled Halloween tree; yep if  you look closely you might see a tree in there. Lol. 

My idea for decorating this raggedy little tree was to throw it all on there with a mismatch of all kinds of Halloween. The more the better in my little world. 
This tree sits in front of the built in china cabinet. I sort of use it as  protection for the cabinet glass since I have grandkids.  For several years, I have had this little cedar doll high chair beside the tree. This little high chair was bought at a craft fair many years ago for one of my daughters. It now holds seasonal dolls. For Halloween prim ole' black cat sits in the chair holding a wool applique pillow I made years ago.  On the wicker settee there is a quilted fall pillow, a pumpkin head pillow made from a skirt and a rail fence quilt top in fall colors. 

It looks as though a witch has crashed into the tree. I placed witch legs purchased from the Dollar Tree at the top of the tree. 


I topped the tree with a paper mache hat I purchased at the Goodwill. It is embellished with pip berries. 


 I have a number of cross stitch pillows snuggled among the Halloween jack o lanterns. This was a freebie I stitched years ago and is a favorite to bring out. 


There are ornaments that my grandsons painted, golden balls, buffalo check ribbons and skulls  scattered through out.  The grandbabies like looking for the spiders. 

Most of the ornaments have come from the Dollar Tree over the years.  Gotta love Dollar Tree. 

This is the view of the tree as I come into the room from the upstair's kitchen." Poisoned Apples" is painted on a scrap piece of wood. I like those no cost crafts.  I had this sign on the hutch last year which was in the theme of a witch's kitchen.  The enamel pot is filled with pumpkins and jack o lanterns, and the same old scarecrow that was out for my fall tree is standing on the stool. 

 My newest cross stitch addition to the tree is this Lizzie Kate freebie called "Spooky Time." I found it on the Lizzie Kate website.  Click here to go to the website to get this and other Lizzie Kate freebies. . 


The little tractor always is at the bottom of the tree. For Halloween, a little bear all decked out in it's pumpkin costume is driving the tractor. 


This little cross stitch ornament was a pumpkin from one of With Thy Needle and Thread's Halloween pieces. I simply stitched the jack and then finished it on a wooden Dollar Tree ornament. 

One of my favorite Halloween ornaments is "Brooms for Sale " by Homespun Elegance. I love anything by Sandra Sullivan.  I finished it into a little pillow hanging from a homemade broom made from a stick and raffia. 

The little black cat ornament was stitched last year and is in pillow finish as well. I was thinking ahead and put a jute hanger on it. The 2nd cross stitch ornament is called Big Jack and Little Jax's and was a freebie on my blog. You can find it here


Thank you so much for taking a Halloween tree tour with me today. After Halloween, I am going to take this tree out of the bushel basket and see if I can refresh it a bit and then onto Christmas decor. Woo Hoo! I always love Christmas.  Have a lovely upcoming week and enjoy all the fall goodness.  If you missed the Fall Tree tour click here
Happy Fall, 
Melisa

Tuesday, October 6, 2020

Santa's Visit- A Barnyard Christmas Freebie

 Happy Tuesday and welcome! Come on in and visit a moment and see the newest addition to the Barnyard series.

Santa has made his way to the farm and his first stop is at the pigsty which is decorated with pine garland along the roof line and a small tree.


Out to greet Santa is Winifred the Pig and of course Henrietta the hen. What treats will Santa bring them?


This is a small just like the other ornaments measuring 31 x 31. I stitched 2 in a day on 14 count aida which means these are fast stitches. One was stitched on coffee tea dyed aida.


The other was stitched on Rit Dyed Emerald Green aida.


Both of the ornaments were finished on foam board wrapped with a double layer of batting. I then used homespun fabrics on covered mat boards. Jute cording was made from jute bought at the Dollar Tree. I also made homespun cording from strips of fabric to embellish the edges. On one ornament I constructed a big red bow from Dollar General ribbon. The other- I used pine boughs from a wreath and made a bow with bits of raffia. Easy peasey!


I hope you decide to add Santa to your stitching list. If so, check out the pdfs below. I have had some questions about what floss I used. They are listed in the instructions which is the 1st pdf. I am trying to use the same floss in all of the ornaments, but use whatever colors your heart desires. I also list the number of stitches for each color that may affect your color choice too.

For the instructions pdf, click here . 


For the color pdf ,click here . 

For the black and white pdf, click here 


I get so excited each time I pull all of the ornaments out. If you have missed any , click on the names below and you will be sent to the post with the charts. Some are pdfs and some are not.  They are:  Chicken Sled,  Santa's Ride ,  Special Delivery , Christmas Barn, Christmas BucketChristmas Tractor , Santa on the Farm,  Mrs. Claus on the Farm ,  and The Stockings Were Hung

Well I am off to see what other happenings may take place on the farm. You all have a blessed day and as always...

Happy stitching, ya'll

Melisa

I would love to see your stitches . You can always tag me on Instagram using #pinkernpunkinquilting . Using the hashtag, gives a greater chance that I will see it considering the device that I am viewing with. You can always direct message me too.


Popular Posts

Summer At the Mill House