Blog Archive

Showing posts with label Hall of Snowmen. Show all posts

Thursday, November 16, 2023

Mr. Snow SAL Block 3 - Snow Mitten

Happy Thursday , sweet friends and welcome! 🤗 I hope your day is off to a roaring good start!  

First , I would like to thank you all for the kind compliments on my sister's quilt that I shared yesterday. I was moved to tears by all of the warm words. 💓🤗🙏

 Last night I pulled out totes of mini quilts, stockings and cross stitch pieces to decorate the downstairs.  Soon the floor was filled with handmade goodness to choose from. 

 Mr. Pinker went to the garage, and in a short time, he brought forth my raggedy old tree which was still tucked in a galvanized wash tub. As Mr. Pinker prepared supper,  I went to town fluffing branches,  stringing lights and hanging ornaments.  

This little ornament is always the first to be placed on the tree. I stitched it for my oldest grandson whose nickname is Rooster. 

All kinds of ornaments were haphazardly placed on the tree; I was distracted by the aroma of steak, mashed potatoes and turnip greens that was coming from the kitchen. 😀😋 You can tell that I need to straighten up a few of these ornies. 

Soon I plopped down onto the couch with loads of stitching still on the floor . 

"What's wrong? Mr. Pinker asked.  

"I just don't understand it. Why is all of this not fitting on the tree and in this room ? I know I had it all of these goodies in this room last year ."   

Mr. Pinker looked at all of the stitching still left on the floor. "Hmmm, you couldn't possibly have had all of that in here..." Then he stopped in midthought and rolled his eyes and with a smile he said "Oh, yes my clutter queen certainly could have ."

I gave him a wink of the eye and soon went back to work. Sooooo .... I am going to continue working on the tree and room today and hopefully soon I will have a photo of the raggedy country tree filled to the brim. 😀😃🎄

A patriotic stick Santa that I painted in the 1990's. 

Today is Embroidery Thursday for me so I will be pulling out my needle and thread and will settle into stitching a little snowguy called  Mr. Snow.  

This week Mr. Snow is as snug as a bug in a rug in his big red mitten for Block 3 called "Snow Mitten" .  

"Rah Rah Rah! Bring on the snow! , Mr. Snow exclaims.

I lightly colored some of the stripes in his scarf, his cap and the bottom half of the mitten. I added French knots to Mr. Snow's eyes and at the top of the pennant stick. 


So far I have shared: 

Block 1 Snowballs,    Block 2 Winter Friends, 

 INSTRUCTION TIME !   Now remember , I am no expert, but am just sharing how I embroider mine. Please prepare your fabric, embroider in whatever manner that  makes you happy. The number one rule is to always have FUN FUN FUN!!! 

INSTRUCTIONS

1. Cut your fabric to 8 1/2 "x 11 1/2" . This will  be trimmed later.  

2.  Place the pattern between a light box or a window and center the design as best as possible. Trace the design onto your fabric using your favorite transfer fabric pen or pencil . 

3. Embroider the design .  I used a backstitch using 2 strands of DMC 498  on most of the design. A stemstitch would look  quite lovely if you prefer.  

4.   I used a French Knot on Mr. Snow's eyes. You do not have to include the French Knot;  you may want to add  teeny beads for eyes . How cute would that be!!!

5. Press and trim to block size 7 1/2 x 10 1/2". If you color tint your blocks, remember to place a paper towel over the tinted area and heat set with the iron.   The finished  block size in the  quilt will by 7" x 10" .

☃☃☃☃☃☃☃☃☃☃☃☃☃☃☃☃☃☃☃☃☃☃☃

If you are interested in stitching this piece,  just grab , the images. For printing tips, refer to the post Tips for Printing which has loads of tips from my sweet friends. 

☃☃☃☃☃☃☃☃☃☃☃☃☃☃☃☃☃☃☃☃☃☃☃☃

My little doodles are hand drawn so they are never perfect. 

In January I always decorate the small foyer in snowmen and mittens. Here is a glimpse of last year's mitten tree with teeny mittens and one of daughter's toboggans. 

Well  Sweetie Pies, there is a tree calling my name so I better finish the task at hand. Have a wonderful day and ...

As always...

Happy  Stitching and Quilting, y'all

Melisa
Mittens are blankets for the hands on a cold winter's day. 

Warm Wishes and Snowman kisses! 
Hugs and Stitches!!!
Dedicated to my sweet Baby sister, Amy . I love you, Amo.  ❤


LINKS THAT MAY STRIKE YOUR FANCY. 

Frosty McChill SAL - This is a link to the 12  Frosty McChill Snoman blocks that I shared in 2021.

2022-Flurry & Flakes SAL  This is a link to the Flurry & Flakes Snowman quilt. It includes 5 embroidery blocks. 

Sweeping Snowman Trifle - A small cross stitch that I created to use as a scissor fob.  

2022- Everybody Loves A Parade- Well I Hope So- A Parade of Winter and Snowman Cross stitch and Doodles. 


Monday, January 23, 2023

We Can Build A Snowman

 Good morning ,ya'll. I am still waiting on pins and needles for a flurry or a flake,❄❅❆ but alas no snow has fallen this winter as of yet. But that is not going to prevent me from building a snowman☃⛄.

It's no secret that I do adore snowmen .  In my hall of snowmen hangs several snowmen quilts. I always get the sweetest compliments on the door snowman quilt that I pieced a few years ago. 

This snowman was stitched using a 5" charm pack of fabric by Sandy Gervais. 


With so many kind compliments, I decided to share how I created this quilt . It is very simple. This time I am using a palette of blues and white fabrics. 


 FABRIC & CUTTING

🧵 Assorted Scraps for the border - CUT 22-   4 1/2" x  4 1/2" 

🧵 White Fabric- CUT 1- 8 1/2" x 8 1/2"  block  ( for the snowman head)

🧵 White Fabric- CUT 1- 8 1/2" x 20 1/2" rectangle ( for snowman body) 

🧵 Blue Fabric- CUT- 4  -  2 1/2" x 2 1/2" squares ( for snowman head) 

🧵 Orange scrap for nose  3" x 8"  ( carrot nose) 

🧵 Black Fabric - Cut 3 -  4 " x 4" squares ( snowman's buttons)

 USE A 1/4" SEAM ALLOWANCE

DIRECTIONS

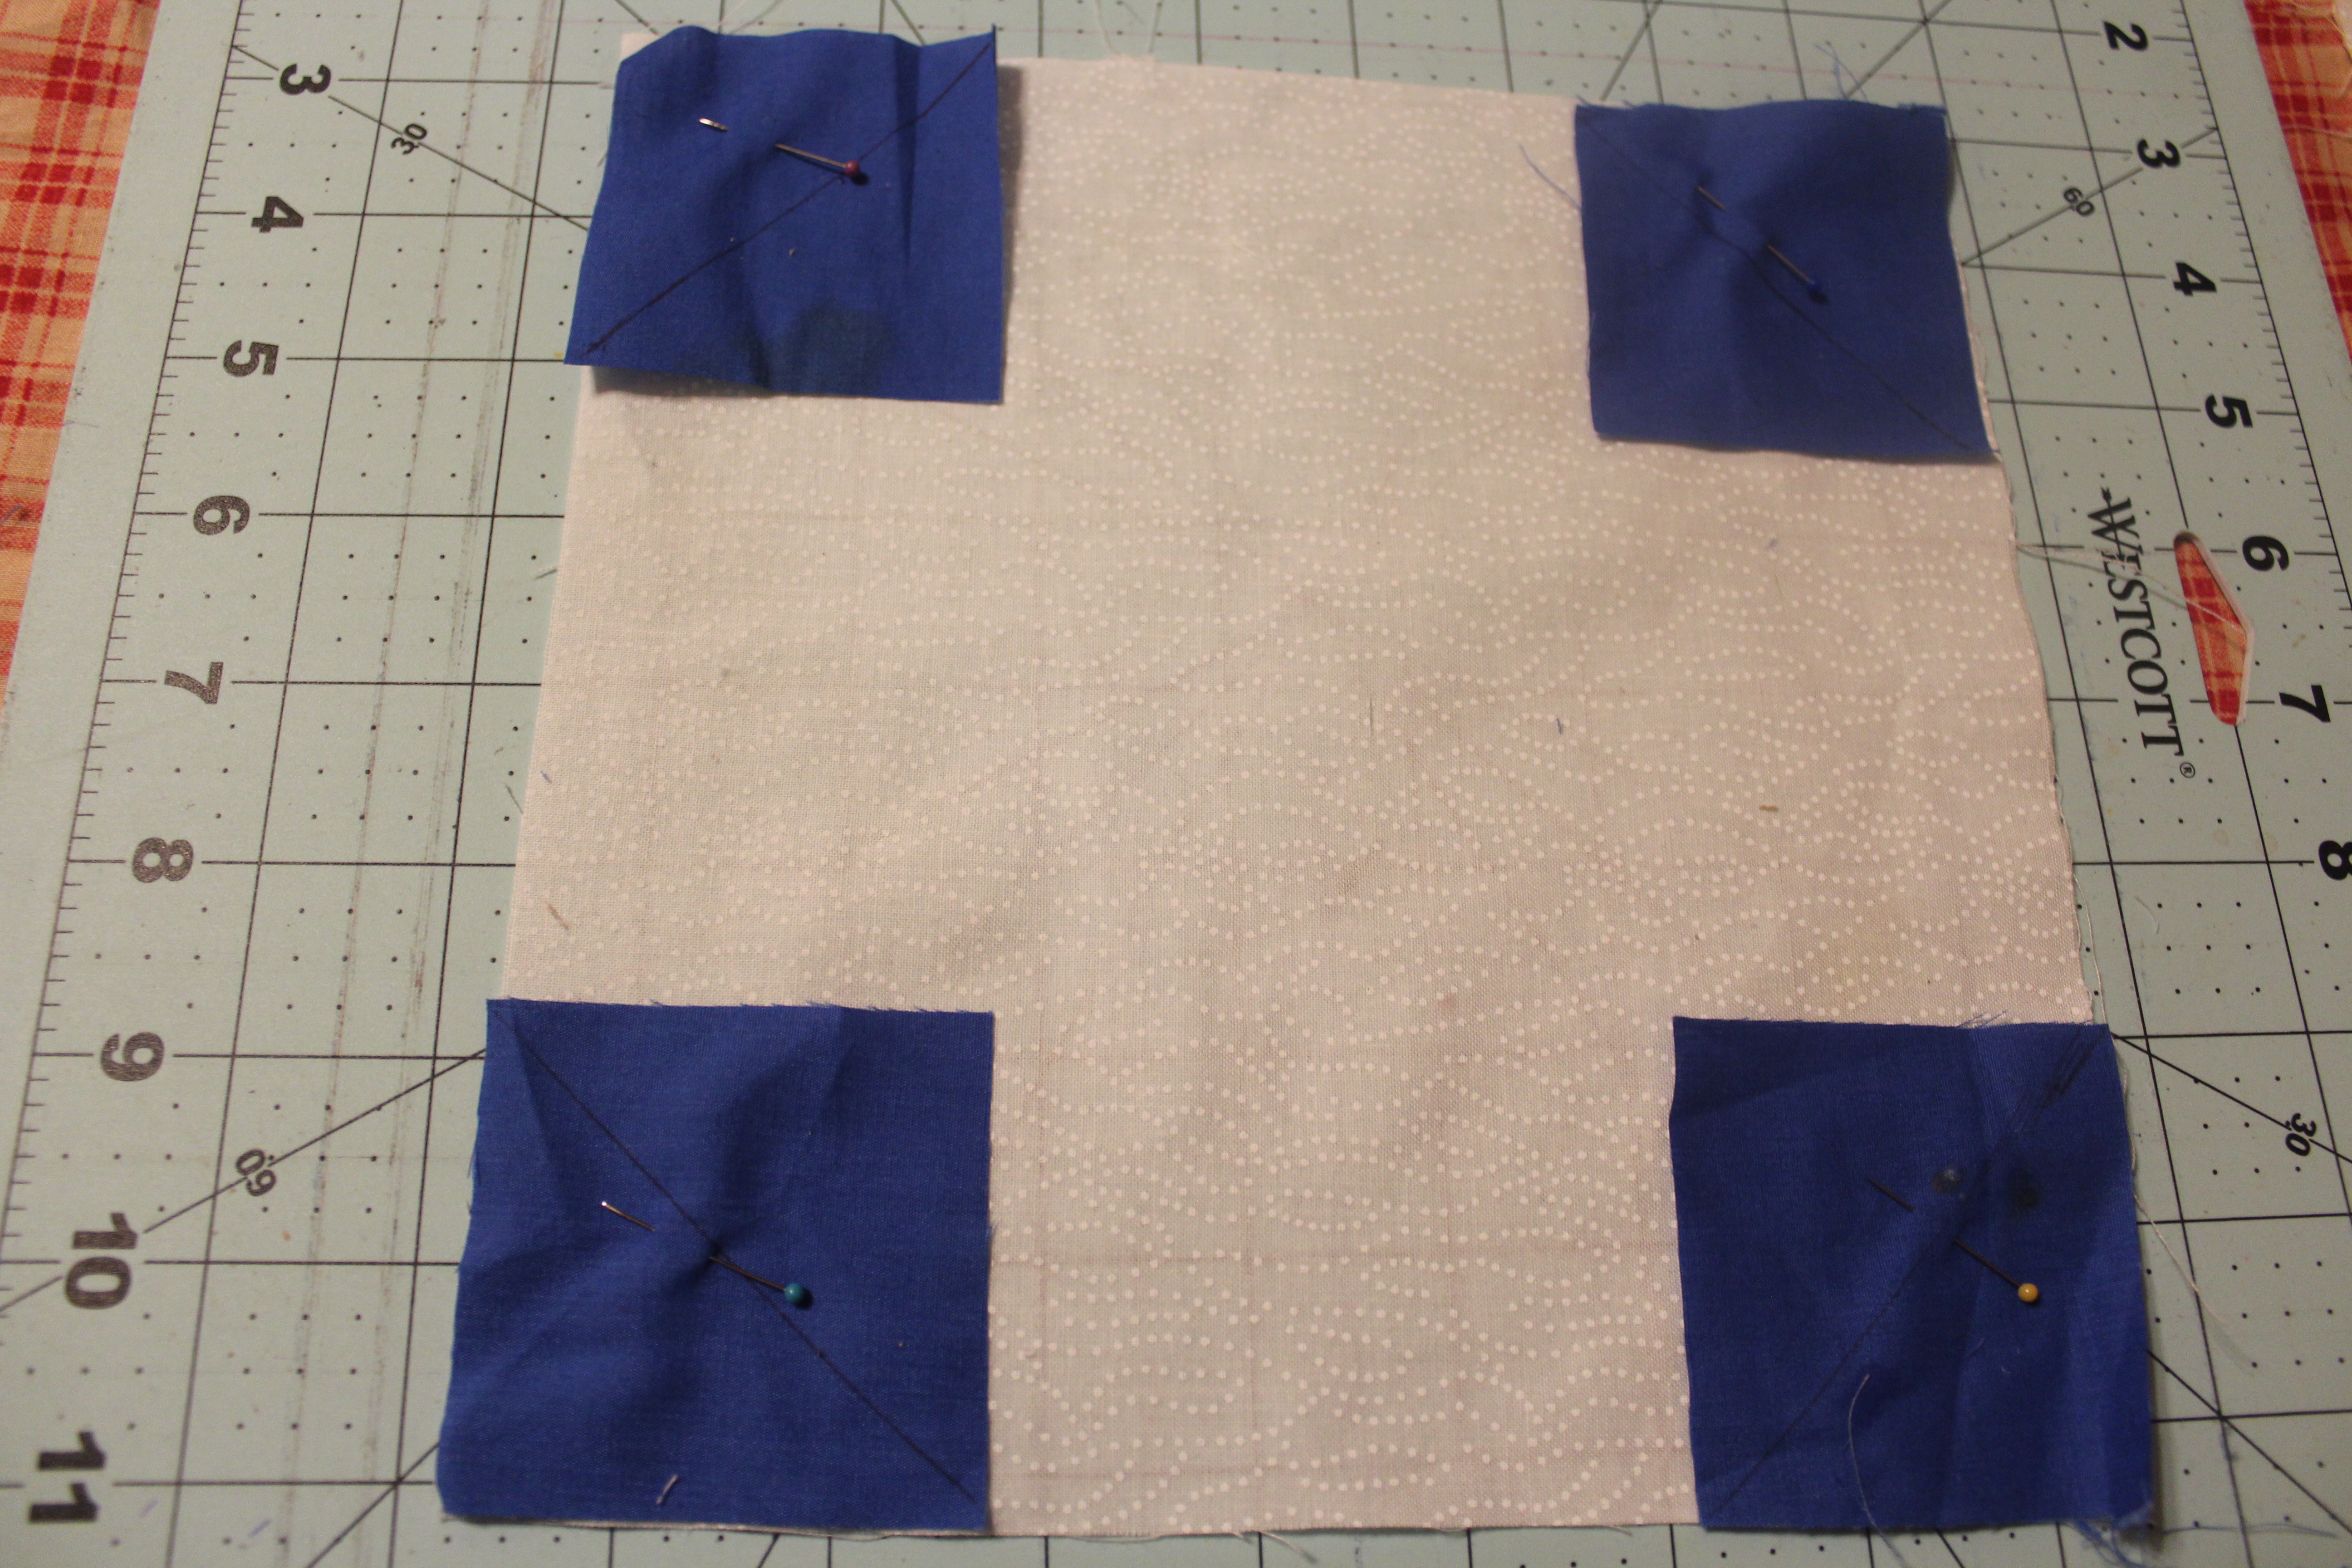
1. On the backside of each of the  the 4  blue 2 1/2" squares draw a diagonal line .

2. Lay each of the 2 1/2" squares face down at each corner of the  white 8 1/2" square. 

 Pay close attention to the direction  your drawn diagonal line is going for we are making a Snowball block. Pin. 

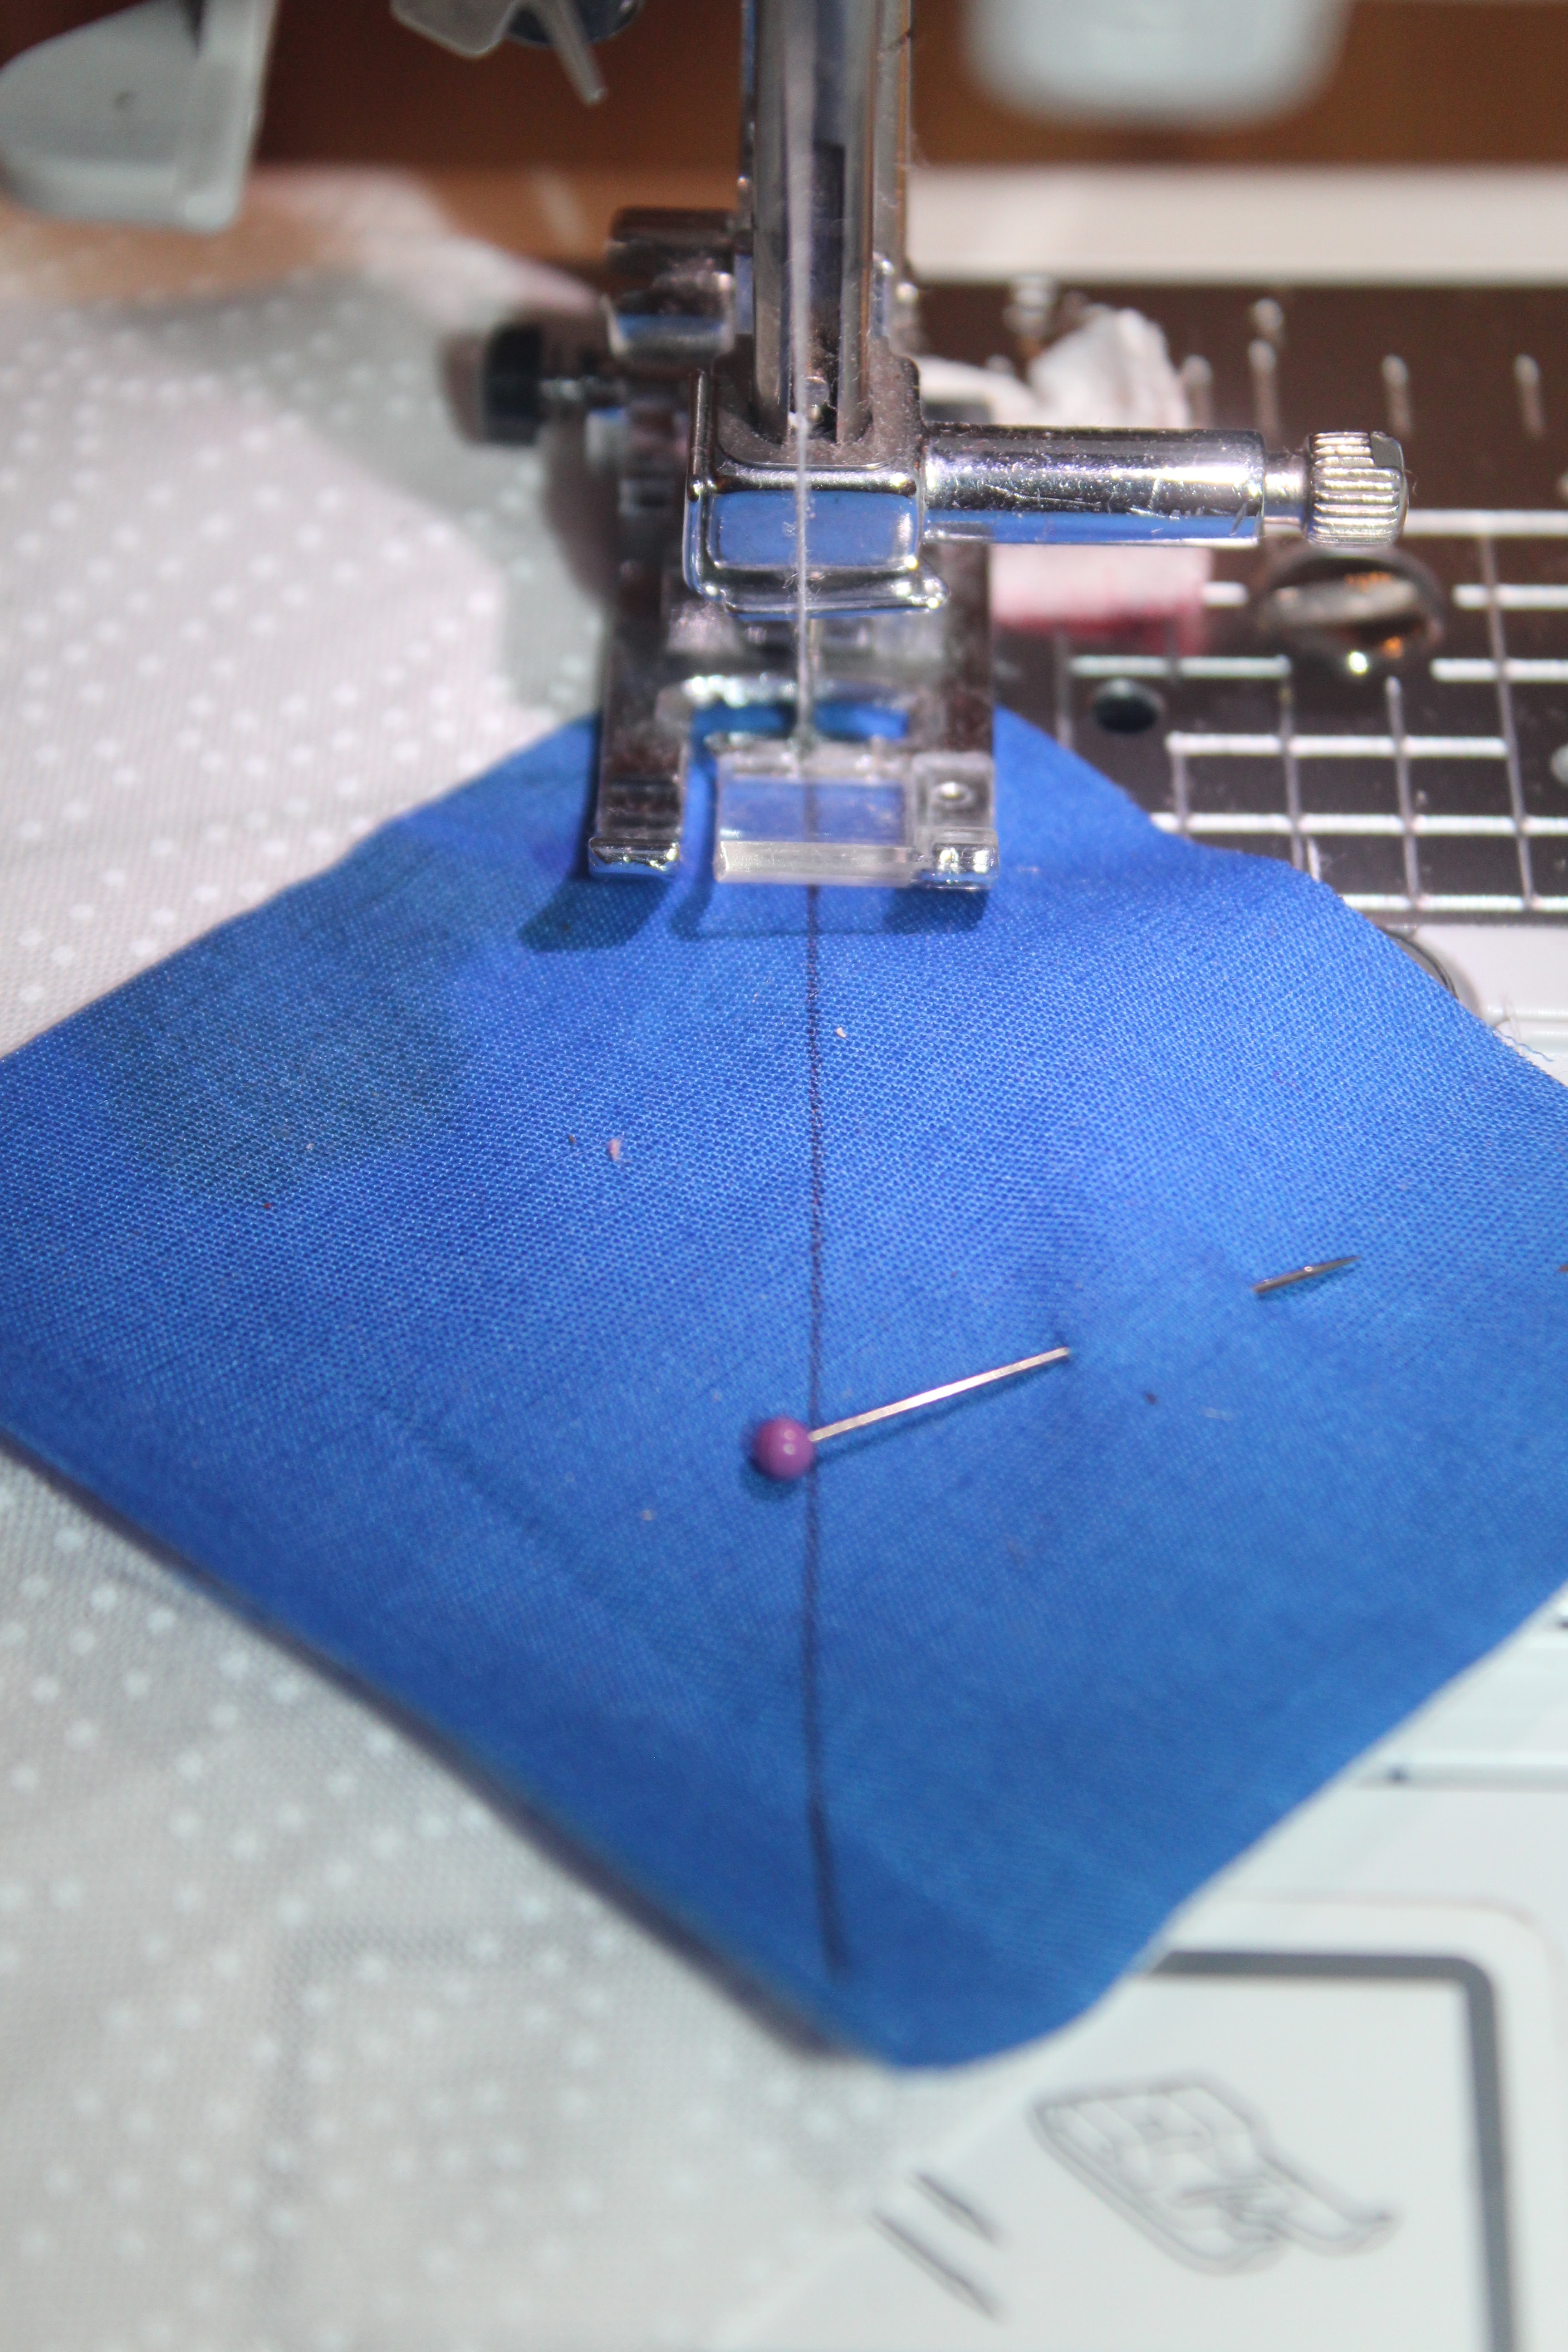
3.  Sew down the diagonal line for each of the 4 corners. 


4. Cut the bottom triangles off of the Snowball Block 1/4" away from the seam. Press.

5. Now sew the Snowball block ( the head ) to the 8 1/2"x 20 1/2" white rectangle ( body). Press.

6. We are now going to piece the border. Lay out your 22   4 1/2" squares around your snowman in a pleasing manner. 

7. Take the 2 squares just above the snowman's head. Right sides together sew these 2 blocks together.  Press. Repeat the same step for the 2 squares at the bottom of the snowman's body. 

8. Sew the units that you created in step 7 to the top and bottom of the snowman.  Press

9. Sew the 9  - 4 1/2 squares into strips for the right border. Press. Repeat the same for the left border. 

10. Sew the right border to the snowman . Press . Repeat for left border. 

11. Wahlah!!! Our piecing is complete. Now it is time for the applique .  You may have to enlarge the image when printing. 


 Using the template , from your orange scrap cut out a carrot nose. If you are using the  needle turn applique method , be sure to  add a 1/4 turn under allowance.  

If you are unfamiliar with needle turn applique, I always enjoy watching Jan Patek on Youtube. She does a phenomenal job explaining. 


12. From the black fabric cut out the round circles to applique for coal buttons down the bottom of the snowman.  Remember to add turn under allowance if you are using the needle turn applique method. 

13. Draw big Xs for the snowman's mouth. Embroider in black .

14. Add 2 large buttons for eye. 

Wasn't it fun to build this snowman?  This guy will go into the hoop in the near future. 

The original quilt was hand quilted with hand drawn swirls and twirls. 

It was a delight to share this snowman with you . Thank you so much for dropping by for a visit. Have a beautiful day and...

  As Always...

Happy quilting and stitching, ya'll

Melisa

Snowmen fall from heaven one flake at a time. 

Hugs and Stitches and Warm Winter Wishes !!!🤗❤🧵

Dedicated to my dear sister, Amy   . Love and miss you., Amo ❤❤

Ya'll come back now, ya hear !

Saturday, January 22, 2022

Hall of Snowmen and a Winter Tree Sampler-

Happy , happy Saturday!!! It's another cold one here. I'll be bundling up and heading to  the grandbabies ' basketball games here soon.  Oh, those little ones are so cute to watch. Most of them can not throw high enough to get a goal, but boy, do they try.  

Well I thought I would take you on another segment of "Country Clutter Tour" . Lol .Today we will be touring the  Hall of Snowmen. ( Oh, if you see any dust bunnies, please excuse them- I've been stitching when I should have been dusting. ) 

 Every winter I put out all kinds of snowmen in my narrow foyer/hall. I have a little tree decked out in mittens.


Sweeping Snowflakes is an older With Thy Needle and Threads piece that I finished on a Walmart whisk broom. 


I have 3 shutters that I found at the Goodwill propped against the wall. I change out the quilts seasonally on them. My favorite is my Coopie Snowman quilt that I embroidered a few years ago.


 The little Snowman in the top hat quilt was a thrift store find that I purchased last year. This is it's first year in the Hall of Snowmen. 


 Chill Out is a Lizzie Kate stitch that I stitched for my  oldest daughter. 

 The Snowman pocket is my adaption of Kim Diehl's "Snowman Door Hanger" . It is a free design at All People Quilts ( Click the name to see that pattern).  


Much to Mr. Pinker's dislike - lol -  my doors inside are adorned with wreath's or quilts.  A little Mittens quilt hangs from a mitten holder. 


This is one of my quilts . 

A snowman quilt hangs on the other door. 


This guy makes me smile- Look at that nose !!!  

My white shelf is crammed full. 

On that  shelf is an old drawer from my Granny's ; I turned it on its side and use it as a shelf. On the top of it is an embroidery I did a few years ago and finished it on a silver tray.

 The little snowman cross stitch was a freebie. Does anybody know who it is by? I can not remember.  

Tucked in the drawer is a free stitch called Winter by  Balades et broderies par Camela . It is  available on her blog in the Jan. 20, 2013 post.

 I did make some changes- I added a border , left off the stars and a few other little changes. Also I have With Thy Needle and Thread's Candy Cane Wishes though I  have not found a piece that I want to mount it on.  

The last stitch on the shelf is my Winter Tree Sampler. 

I could not figure out how to finish it. I did not have a frame so I opted for a pillow finish. Better finished and on display than in the shameful "Need to Finish " pile.  


If you would like to stitch Winter Tree Sampler, I invite you to check out the links below.  

Click here for the Instruction page. 


Click here for the Colored Chart. 


Click here for the Black/White chart.


 Well that's a wrap of my country clutter hall segment. I hope to share my hutch this next week. Thank you so much for the sweet visit, my friends. Wishing you the most blessed and beautiful weekend. As always...

Happy stitching and quilting, ya'll

Melisa

Remember our souls are like snowflakes - all different and all beautiful! 

Hugs and Stitches!!!

Dedicated to my sweet sister, Amy. So many of your snowman pieces are on display , Amy . They warm my heart. Love you.


Popular Posts

Butterflies and Candy Corn- A Halloween Sampler Freebie