Blog Archive

Monday, November 30, 2020

Prim Winter Joy - A Christmas Freebie

Hello, dear friends. The chill is in the air as cooler weather has moved in.

The weatherman actually predicted a little snow though I would be quite surprised if we did get a flurry. Still I can dream of snowflakes as I continue to tweak my Christmas decor.

A little country Christmas on the bench. 

Pulling out my Christmas tins.

Country Santas are on the hoosier. 

My hoosier is a work in progress. I put out a few cookie jars, and the Santas that always go on top. Above my hoosier is a red shelf overfilled with advertising tins. I like that "old General store kind of look ."

I have been busy decorating the hutch , but more on that later. 


To be honest the house is a mess - boxes need to be put up, odd and ends need to be put away and pine needles from the faux trees need to be swept. How come I can always find a stray needle or two even 6 months after the tree has been put away and all has been cleaned? Lol. 

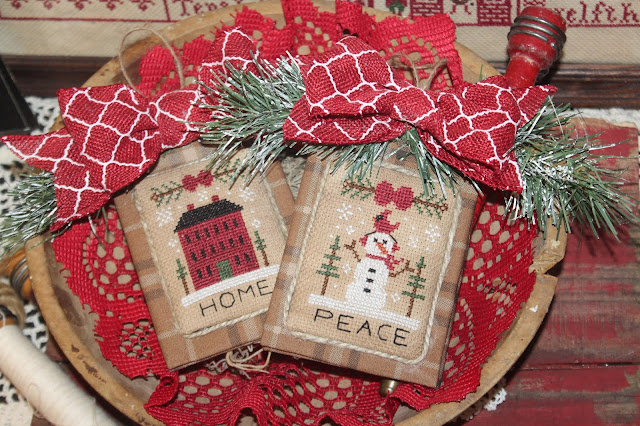
In the midst of pulling out decor and visiting family for the Thanksgiving holiday, I have been plugging away on my Prim Winter ornaments.  If you haven't seen my first two ornaments, click on the names below, and you will be directed back to the posts and the pdfs.    Prim Winter Home,or Prim Winter Peace   .

The newest ornament is called Prim Winter Joy. 

It is similar to the other two ornaments with a pine garland and bow at the top and a line of snow with the word Joy below. Two little deer leap over the trees into the snow filled sky, and a potted tree is in the center.

I used the same colors as in the last ornaments except I did add DMC 782 Dark Topaz for the star and the band on the bucket. 

It is a small measuring 33 W x 45 H. I stitched mine on 14 count tea/coffee dyed aida.  I am an aida girl.  Using this size fabric, brought the stitch to a measurement of 2 3/8" X 3 1/4"

There are a lot of little snowflakes in this piece; my suggestion is to put the snowflakes in last and put them where you want and not worry about the placement. Lol that is how I roll. I used B5200 but choose a white that you like or you could leave the snowflakes out if you wanted. 

I eventually want to add a teeny button to  the center of the bows on each of the ornaments but have not found one yet. 

I would love for you to put this little design on your future stitch list. If you are interested, just check out the pdf's below. If you have been here before, you know I am not tech savvy or a professional designer but am doing this for fun. I have to put each page on separate pdfs and they may print up light, but I am trying. 

For the instruction page, click here .

For the color chart, click here .
For the black and white chart, click here


I had originally thought about putting these on my downstairs cross stitch tree, but it is crammed full. You know what that means- I need to find a place for a new tree. I do have a little tree that I have been putting them on , but the more I see these in the little dough bowl , the more I am liking this display. It is a possibility . 


Well thank you so much for popping in to visit me . I hope you enjoy this little design and as always...

Happy stitching, ya'll!

Melisa

 I am so touched that you take the time to not only visit , but to leave comments, shout me out or  stitch my designs.  You really know how to warm a gal's heart. Thank you so much.  If you do decide to stitch one of my pieces, please tag me and use #pinkernpunkinquilting. I would love to see your stitch and you can always Direct Message me.  Have a blessed day! 


Monday, November 23, 2020

Prim Winter Peace- A Prim Christmas Series Freebie.


 Well Happy Tuesday!  Do you have a busy week planned? Cooking, decorating or visiting family? I plan on making a few side dishes for Thanksgiving for the family feast . Other than that I will have play time in the quilt room. 

 Last week I had showed a sneak peek of a little ornament that I was working on which was a snowman.  This is Prim Winter Peace- the 2nd in my little Prim ornaments series that I am working on for my downstairs Christmas tree. 


 A little snowman enjoying a cold winter day with a cardinal perched on his head.  I just love cardinals though our cardinals are not taking advantage of the feeders at the moment.  


Last week I introduced Prim Winter Home. If you missed last week's ornament in Prim Christmas Series , click  on  Prim Winter Home

Prim Winter Peace is similar to Prim Winter Home . It has the black wording on the bottom  followed by a line of snow and the same pine bough with bow at the top.  

I am planning on 5 of these ornaments - all using the same floss colors. I am using DMC . For this ornament, I used 310, 221, 895, 898, B5200  & added 920. Now I always like my whites to pop so I usually use a bright white like b5200.  I would suggest using your favorite floss colors- that is what I am doing. I do not have a great floss collection and just use the same colors all the time which fits my own decor and personal preference. 


This is a small measuring 33 W x 45 H. I stitched mine on 14 count tea/coffee dyed aida which means it measured around 2 3/8" x 3 1/4". 
 
I finished Prim Winter Peace just like my Prim Winter Home which if you are interested you can refer back to that post. 


If you would like to add this little snowman to your stitch list, just check out the pdfs below. Now I do have to put a disclaimer- I am not a professional designer nor do I have a professional set up. The pdfs' may print out light. I have not found a remedy to change that. 

For the instruction page, click here

For the colored chart,   click here


For the black and white chart,  click here


 I truly hope you enjoy this little snowguy .  Have a beautiful day and as always...
Happy Stitching, ya'll
Melisa
How wonderful it would be if you would tag me and use #pinkernpunkinquilting if you post one of my designs. I would love to see it.  You can always direct message me too. 


Sunday, November 22, 2020

Quilt Happenings! And is it Spring?

 How are you doing on this warm November day. It has been so nice and comfy here. I can honestly say I can not believe it is November. 

The burning bush is turning a bright red and is filled with berries. It is always so pretty this time of the year. 

The blueberry bushes also have pretty red leaves and the trees behind are already loosing their leaves . However my redbud trees are blooming- I think they are confused, and they think it is springtime. Well the temps. sure feel like that. I  love running around in shorts in the middle of November. 
It has been a good quilting week. Here is one of the stacks of quilts that I shared on IG. The little blue  churn dash quilt is one of my favorites. I made 3 of those a few years ago and gave 2 as presents. In the small basket is several small quilts and quilt tops waiting to be quilted. My Turkey Creek Manor cross stitch freebie sits with these little quilts. You can find it here.  I love collecting wicker picnic baskets. This is my newest addition, and it is filled with finishing supplies that I have been using to finish my Barnyard Christmas series. It was awful handy to have everything I needed in one basket. Why I did not figure that out earlier as I was finishing those is beyond me. Lol. 
Last week, I had been  working on several nine patch variation blocks in red and green scraps . I pieced those together into a small quilt this week. Some of the fabrics in this quilt date from the early 90's, and there are a few pieces in the quilt from my girls' clothing which brings back sweet memories. This is the next quilt to go into the hoop.
Previously in the hoop,  was my Christmas tree strip pieced quilt, and it was inching towards a finish. I just had one more block to quilt and then it would be completed. 
 Well I got er' done this week. Woo Hoo!!!!  I will show it in another post once the binding is completed. That meant a new quilt was going into the hoop. Which quilt should it be ? 
 Well, I had completed this little quilt earlier this week and posted the Santa Mug doodle on my blog which can be found here

So the Santa Mug quilt was the next quilt to go into the hoop for the week. I quilted it in a day. It is a small quilt so it was real quick. Now it is time for binding  this baby ,and then I get to display it with my Santa Mugs. Woo Hoo!
I then went to my stack of shirting  material given to me by a dear friend. I cut random strips
and then pieced those together. I have a plan for these little guys. 
It is now time  to get down to business and turn these little strips into quilt blocks. 
That will be this week's plan. 
My final project that I worked on for the week is these sweet Rudolph blocks. I found a shirt made out of this Rudolph fabric , and I knew I wanted to make a quilt from it. You can get a lot of quilting fabric out of clothing. I cut out 12 six inch Rudolph blocks, and then used it in a Puss in the Corner Quilt blocks. I plan on 12 blocks, but I will see as I go . 
So that is the quilt happenings for the week. I wonder what I can get into this upcoming week. Let's hope a lot of goodness. 
Have a beautiful day filled with joy and as always, 
Happy quilting,
Melisa


Friday, November 20, 2020

Santa Mugs and a Vintage Santa Mug Doodle - Freebie

 Hello, dear friends. Come on in and pick up a mug of your favorite beverage and let's visit for a moment. 

Well November 1st has always been my Santa Mug Day- the official day I put up my big tree and bring out my totes of Santa Mugs. Not this year though.


My decorating got pushed back because I went to help my daughter decorate her tree. But that is perfectly fine. I  had a fun filled day decorating a tree even if it was not my own. My daughter's tree was decorated in the farmhouse theme. Most of her ornaments were purchased from Walmart,  and they were so cute.  As for me,  Thanksgiving decor was put up in the kitchen and foyer and the rest of the house began to be dressed in its Christmas decor. In the midst of all of this I have also been trying to stitch, quilt and do a little crafting. Wheew! So much to do and so little time, but it is my favorite time of the year.


So this year my "Santa Mug Day" has been stretched over many days . I love collecting vintage Santa Mugs. My collection began actually with one mug bought in the 1990's because it reminded me of my Granny's mug. Unfortunately, I do not know where Granny's mug went. Granny lived in a little  secluded log cabin on the mountain and having grown up during the Depression, she was a make do kind of gal, and she carefully saved what she had. I always loved Granny's decor. She would cut down a little cedar tree, and the tree was filled with old Star Brite ornaments, a crocheted gingerbread man, vintage Santas, colorful lights  and lots and lots of tinsels. As children, my sister and I  loved to blow the strands of tinsel on the tree. Granny also had one lone Santa Mug in her Christmas decor. This mug  started my deep obsession.
I now probably have around 50 Santa mugs, not all are vintage. They used to be easy to find in the thrift stores for less than a dollar, but they  are harder to find now .  I still love to search for them though. So what about you? Do you like to collect any particular type of mug for the Christmas season?
I do not use my Santa mugs to drink out of , but I do decorate with them or put little bottle  brush trees or sprigs of holly  in them.
These are a few photos from last year's display. 


In celebration of my Santa mug collection, I have began a small  embroidered quilt.
 I drew out a little Santa Mug to embroider on a piece of scrap fabric.  I used a stem stitch on my embroidery and color tinted the image with crayons and then set it  with an iron.  I then did a little piecing using scraps of red and green fabric to frame in this little Santa block. Now my little quilt is not finished, I still have some more work to do on it, but I still thought I would share this work in progress.

 I used DMC floss to do the embroidery work ; those colors are 3839, 899, 353, 318, and 304.
 I would like to restitch it into a little pillow and only do redwork. Hmmm , my mind is always buzzing with the next thing to do whether it is completed or not.  Are you that way? 

Last month I posted my little Cup of Christmas Cheer cross stitch. If you missed that, click here to go to that freebie.

 Illinoisstitcher on Instagram made the cutest little pillows ornaments for relatives for the season. She omitted the tree and just stitched the mug; so if you haven't seen her stitches; please check her out. She is very prolific and does such beautiful work. Of course I do want to copy cat her and make some ornaments too. Lol.  I have seen so many stitchers working on this Santa Mug stitch which warms my heart. 

 To go along with that stitch ,  I decided to post this little doodle for creative uses.  If you are interested, just click on here for the pdf.  It is a simple little doodle.


This can be used for embroidery, punch needle, paper crafts, wool applique or whatever you dream up.

I hope to get my little embroidery into the hoop soon and then displayed with my collection.  


The other day, I was  searching for some yummy holiday recipes on the wide web, I found this recipe called Santa's Whiskers. Now I have not tried it, but it sounds very interesting and I plan too. I will have to let you know how they turn out. If you have ever had these I would love to know what you thought about them . 


Santa’s Whiskers 

Makes about 5 dozen cookies.

Ingredients:

1 cup butter or margarine, softened

1 cup of sugar

2 T milk

1 t vanilla or rum flavoring

2 1/2 cups all purpose flour

3/4 c finely chopped red or green candied cherries

1/2 c finely chopped pecans

1 c flaked coconut


Directions:

In a mixing bowl, cream together butter or margarine and sugar, blend in milk and vanilla or rum flavoring. Stir in flour, chopped candied cherries, and chopped pecans. Form dough into two 8 inch rolls. Roll in flaked coconuts to coat outside. Wrap in waxed paper or clear plastic wrap; chill thoroughly. Cut in to 1/4 inch slices. Place on ungreased cookie sheet.Preheat oven to 375 degrees. Bake for about 12 minutes or till edges are golden brown. Remove from cookie sheet to rack to cool.


Thank you  so much for visiting me today. I think I am about to pull out some mugs and continue decorating, and then I am going to  relax with  a little quilting.  Hope you are getting into the Christmas season. As always ... 

Happy quilting, ya'll,

Melisa 

Monday, November 16, 2020

Prim Winter Home- A Prim Christmas Series - Freebie

Hello, dear friends. I have the Christmas music playing.  A little Bing Crosby Christmas has been boosting my Christmas spirit with "Jingle Bells" and "Santa Claus is Comin' To Town" among other festive tunes. 

 Eighty percent of my Christmas is up, and I am still doing a little tweaking here and there. 

 I pulled out my cross stitch ornaments the other night . I am amazed how my collection has grown in 2 short years.

My dream is to one day have a  tree like Carol's of Stitching Dreams. Click here to see her 2019 tree. What can I say but stunning! Can you imagine all of the hard work and hours that Carol has put into this tree?   Well as they say "Rome was not built in a day" so I keep plugging away to one day have my dream tree. 

I have to admit I was feeling a little bummed that the Barnyard Christmas series was winding down though I may sneak in another one in the future -I just can not resist.

 So Sunday I got in the mood to start a new little series. It is not going to be a lot of ornaments but just a few quick  small stitches. I was able to design, stitch, and finish this piece in a couple of hours- all while watching and laughing to  The Golden Girls on TVLand. Lol love that Dorothy.  To be honest the finishing took less that 30 minutes. Woo Hoo! My kind of finishing.


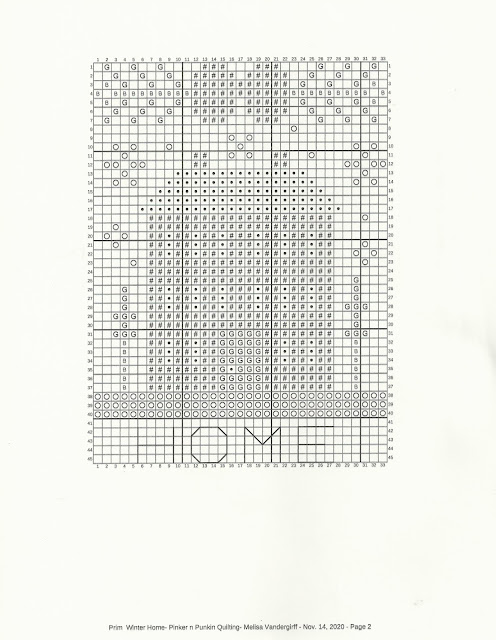
 Well let me introduce you to Prim Winter Home. It is simple but sweet in my eyes at least. I used only 5 floss colors- all of which were DMC . The house is stitched in 221 That is my current favorite color ; next week I  may have a different one. The other floss colors were 898, 895, 310, and B5200 or white. 

This is a small measuring 33 W x 45 H. Of course I stitched mine on  14 count aida which I tea/ coffee/ walnut dyed. I had to dye mine twice to get it a little darker though I think I needed to dye it a 3rd time. 


I finished this little stitch using 3 pieces of cardboard. The stitched piece has 2 layers of batting underneath.  If you are interested, here are the measurements of the finishing boards that I used.   I allowed a little allowance on the top of the Fabric Covered Boards to allow for the bow. 

Stitched Pieced  Board -   2 1/2" x 3 1/ 2"

Fabric Covered Boards ( Front and Back) -  3 1/2" x 5 1/2"  (Cut 2)

I used scrap fabric to finish the ornament and used jute twine from the Dollar Tree as a hanger and as cording around the edges of the stitched piece. The bow was ribbon from the Dollar General for just $2.00 .

Now some of you who have followed me for awhile may have figured out that I am sort of thrifty . So what I have done for my bits of greenery?  I bought a Christmas wreath at the Goodwill, and when I need a bit of greenery for embellishment, I snip a couple of pine boughs from the wreath. It is a lot cheaper for me than to buy little picks. I take a little acrylic paint and add dabs of white to the needles , let it dry and then  the snips of greenery are ready to use for embellishment. Walla ! 

If you are interested in stitching Prim Winter Home , the pdfs are below. As many of you know , I am not a professional designer and am just doing this for fun. I have to work off a number of devices to generate a pattern; therefore I have to put each page in a separate pdf.

For the instruction page,  click here .

For the color chart , click here.


 For the black and white chart, click here 

I truly hope that you enjoy this little chart. I can not tell you how much that I appreciate you all, visiting and checking out my little charts. Like I have said before the cross stitching community is such an amazing community and has been a blessing. I just want to give a little bit back in hopes that someone might find a little pleasure and comfort as I have. Plus I have always enjoyed a freebie. Lol ; every time a real designer posts a design or a freebie I do get all excited.  I know a lot of you probably understand my elation.  

I hope you have a beautiful day .Sending y'all a big hug and wishing you many blessings.  And as always...

Happy Stitching, ya'll

Melisa

Hey , You know what? I would love to see your stitch. Please tag me on Instagram and use #pinkernpunkinquilting ,and if you are not sure if, I will see it or not please Direct Message me.  


Popular Posts

Wordless Wednesday- Nature on the Road