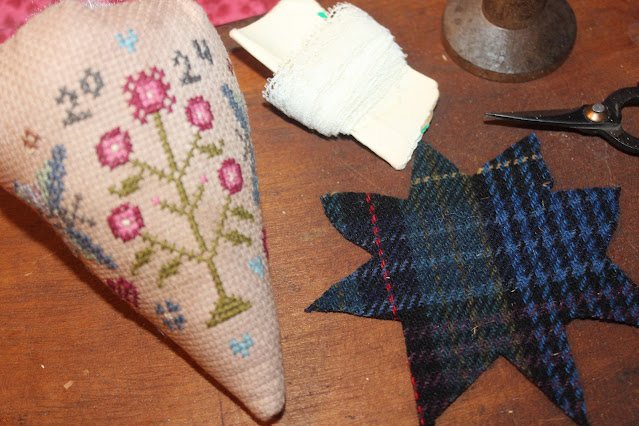
Good afternoon, Sweetness. This morning I shared IN MY HEART SHE BLOOMS berry which is in memory of my sweet sis, Amy.
I thought I would take a moment to show how I made my berry.
Please check out these ladies! There are far better at explaining how to create a berry finish than I am .
GREAT TUTORIALS OS STRAWBERRY MAKING
1. Vonna Pfeiffer-
Making your cross stitch into a Strawberry - Vonna, The Twisted Stitcher
2. Helen D. - Flosstube Extra: Strawberry Tutorial
🍓🍓🍓🍓🍓🍓🍓🍓🍓🍓🍓🍓🍓🍓🍓🍓🍓🍓🍓🍓🍓
THIS IS HOW I CREATE MY STRAWBERRY. Now, ya'll, I am not an expert and I have been known to take thrifty shortcuts. Lol. But here goes.....
1. Iron the piece.
2. Using the Strawberry template which is with the berry stitch pattern, cut out a piece of fusible webbing such as P44 F. I also cut out a piece of white muslin.
 |
| Stitched piece, Interfacing and muslin |
3. To the backside , add a light Pellon interfacing such as P44F.
The fusible should have a bumpy side. Iron it to the backside of the stitching. Follow manufacturers's instructions.
 |
| Back side of stitching and interfacing |
 |
| Center interfacing |
I always use a pressing cloth ( an old piece of fabric) to cover the fusible when adhering the fusible to the stitched piece in order to protect the iron.
 |
| I cover the interfacing with a piece of cloth and press. |
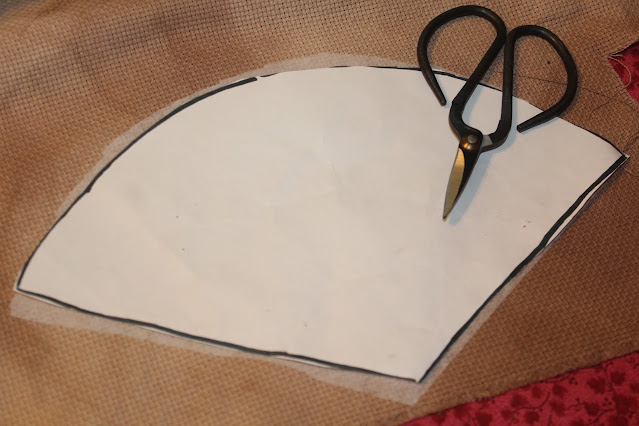
4. I have provided a strawberry template. You may need to resize it to fit your stitched piece. 1/4" seam allowance needs to be added when cutting the fabric.
5. Center the strawberry template over the stitch. Be aware of where you want the design to go when centering the template . I used a pencil to draw the strawberry design onto the back of the stitch. This will be my sewing line. Cut 1/4 " around the strawberry shape.
 |
| Stitching is cut out with a seam allowance added. |
I added my white muslin to the back of my stitched piece centering it over the fusible. Because I cut my muslin too short, I just pinned it.
 |
| I added white muslin because I am going to stuff the berry with wood shavings. |
 |
| It's time to fold and sew the berry. |
6. Sew the sides together making sure to include the muslin in the sewing seam. I slightly curve the tip rather than making it pointy.
 |
| Fold the berry in half creating a cone. The white is the backside. |
 |
| Sew the side of the berry. Slightly curve at berry tip. |
7. Turn the strawberry to the right side and using a blunt instrument such as a chopstick to smooth out the point.
 |
| Berry is turned inside out . It is ready to be stuffed. |
8. Along the top of the stitch with needle and thread create a long running stitch for gathering later.
 |
| Stitch long running stitch about 1/4" along top of berry. |
9. I stuff my strawberries with sawdust and polyfil. Where do I get my sawdust? From Mr. Pinker's workshop. As I stuff, I use my wooden chopstick to pack the material.
I am very messy crafter so I use an old ice cream bucket and ziploc bag as I stuff my berry. I also use a small funnel every now and then .
I am very messy crafter so I use an old ice cream bucket and ziploc bag as I stuff my berry. I also use a small funnel every now and then .
10. I begin by packing the tip with sawdust and then add layers of fluffed polyfil and sawdust.
 |
| The berry is stuffed full. I use a chopstich to pack the sawdust along with my fingers. |
I try to pack mine super tight , but that is a personal preference.
11. When I have the strawberry stuffed, I pull the thread along the top of my strawberry and draw it to where it is almost closed .
This looks like a mess doesn't it? LOL. I am beginning to close the berry up adjust the gathers and stuffing the folds with more sawdust and polyfil.
 |
| Fixing to close the berry. |
12. I then tie it and begin adding more stuffing and sawdust using the chopstick to stuff the gathers along the top of the strawberry as much as possible. This is where you can really pack it down tight pushing polyfil down into the sawdust. It also allows you to work with the shape of the berry .
 |
| I add more polyfil before I tighten up the hole. |
13. Once that I am satisfied with how the strawberry is filled, I close the small hole at the top .
 |
| The berry is stuffed. |
14. I then add the cap . This is where you can be creative as you want to be. I added a wool cap to my strawberry and used the blanket stitch to attach the wool to the strawberry. I embellished the top with a large button . You can add lace, ribbons, flowers- whatever you imagine!!!
 |
| I used a piece of wool and cut out a cap using the template. I made my cap a little larger and adjust it to where I want in respect to the stitch. |
 |
| I used blue floss to button stitch around the wool cap. |
 |
| Lace, ripped plaid fabric and a button are used to embellish the top. I sewed the to the top of the berry |
15 .Afterwards, I used a 2 strands of floss and created large x's along the seam in the back of the strawberry.
WAHLAH! My berry is complete!
Thank you for dropping by to see how I created my berry.
As Always...
Happy Stitching and Quilting, y'all
Melisa
" Crafting is a way to escape reality. "- Unknown
Hugs and Stitches!!!!🤗🧵❤
Dedicated to my dear sister, Amy. . I love and miss you so much.. Love you , Amo.


Fabulous tutorial and one day I will give it a try. In the meantime, I'll just send mine to you to finish. OK? ROFLOL Can you guess who left this comment? teehee
ReplyDeleteHee ! Hee! You just send your finish right on over, sweet friend. Love ya' . Thank you so much, Sweetie, I hope you are having a fabulous day. Don't ya' get too hot being out and about.
DeleteMelisa, a great tutorial and very helpful for all of us who stitch by the seat of our pants, LOL! Have a wonderful day and a great weekend!! More homemade Ice Cream, perhaps!! Hugs from Arizona.
ReplyDeleteLOL, Mary. I stitch and finish by the seat of pants too. Hee ! Hee ! So my finishes are never perfect but I get them done. Guess what hubby ? Hubby is heading to the store for more ice cream supplies . Maybe the ice cream maker was a mistake. LOL. Have a blessed day. Hugs.
DeletePreciosa y estupenda explicación.
ReplyDeleteGracias por compartir y BESICOS.
Thank you very much, Arish for the kind compliment and the sweet visit. Have a very lovely day. Hugs.
DeleteThat’s a great tutorial Melisa. Thank you for the wonderful pattern and for the instructions on how to put it together. I hope to have a go before too long. Thank you again, my friend. Hugs, Barbara @flashinscissors. ☺️🙋♀️👍🤗👋🩷xx
ReplyDeleteOh thank you so much, dear Barbara. I am not the best at finishing but I try. They seem to come together in the end. LOL. Have a wonderful day, sweet friend. Hugs and Blessings.
DeleteThat is one super cute berry! You are such an amazing artist and stitcher!--TerryK@OnGoingProjects
ReplyDeleteAaaw shucks ; thank you so much , dear Terry. You brought a big ole' smile to my day. You are pretty talented yourself :) Have a great evening. Hugs.
DeleteI am a bit confused. Thank you for the terrific tutorial. The pattern isn't for the new berry but the other earlier berry. Both are lovely, but I wondered if that was intentional.
ReplyDeleteBoy, did I get your last two posts all muddled up. The NEW berry is lovely and please forgive my confusion in my replies. LOL
ReplyDeleteAaaw do not worry about that, Ginny. I originally had both posts in one but I thought it was getting awfully long so I broke it down in to two. I hope to post in another berry in the near future. Thank , you sweet friend for the sweet visit. Hugs.
DeleteI love the berry and want to try one. Thank you for the tutorial. Have a berry nice weekend!!!!
ReplyDeleteI didn't expect the sawdust as filling material. I suppose crushed walnut shells would work as well? Are do you need something finer?
ReplyDeleteExcellent tutorial, Melisa. Sewing a slight curve at the end is a great tip!
ReplyDeleteWhat a great tutorial, Melisa. I've made little strawberries just using fabric, but never one that has been stitched. I'll definitely file these directions away for the future--thank you! ♥
ReplyDelete